• About
  • Nutrition Services
  • Upcoming Classes

Cosmo Hippie Chef

~ Local Seasonal Food, Nutrition, Love

Cosmo Hippie Chef

Tag Archives: garlic

New Mexico Green Chili Pork Stew

25 Monday Feb 2013

Posted by cosmohippiechef in seasonal, soup, vegan

≈ 2 Comments

Tags

chilies, garlic, gluten free, local, onions, pork, potatoes, tomatoes

DSCN2628Love:

I know this is a stark contrast from my last two blog post, but I have to say that this recipe is one I just had to share. This recipe is about memories, relationships and the love and hard work of our food community that made it possible for me to make a version of this dish I feel good about eating. I am very picky about eating meat and where that meat comes from. I prefer a vegetarian/vegan diet BUT on occasion I crave dishes that include meat, for us that meat must be local, and sustainable raised without drugs, we want happy healthy meat. When I cook with meat it is usually a special or classic dish like Perfect Roast Chicken or Grass-Fed Beef Stuffed Acorn Squash or even my Fish Tacos, this New Mexico Green Pork Chili fits into that category. The first time I had this dish was at my friend Erin and Nicole’s house for an after Christmas party two years ago, even though they had made a vegetarian Lentil Soup I was drawn to this Pork Chili, I couldn’t get enough! Those flavors were so intense and reminded me of the Chile Verde we ate as kids, up until this point my mom’s is the best Chile Verde I have ever eaten. I had to know this recipe, I begged Erin to share the recipe and teach me how to make it- she said yes. Thanks to Erin for letting me share with all of you.

Fast forward a year. Just before Christmas The Downtown Alliance had their second Winter’s Pop Up Farmers Market. Our good buddy Julie Clifford of Clifford Family Farms was there with her goodies, we usually buy eggs and honey from her but this time I was looking for pork. We had just watched the movie‘ Fresh’ and we were curious about how she handles the slaughter of her animals. Julie is very protective of her animals, she shared with us that it is hard for her, and in the past she wasn’t happy with whom was handling this part of her production so she searched out someone who was gentle with that process, (trust me I know there is no gentle way when it comes to this subject). Now she personally walks her pigs in to be processed so they don’t have to be scared. I tear up just writing this because it is not lost on me that an animal was sacrificed for me to make this dish. If you know Julie, you know it’s not lost on her either. I feel very lucky that I can look in the eyes of the person/farmer who is providing the food that nourishes us, that would not be possible without the love and dedication of these people and our community for supporting that and giving us access in the form of Farmer’s Markets and locally owned specialty shops.

Next I had to locate chilies, see last summer I was so busy canning and trying to get ready to leave for Italy that I didn’t freeze roasted Hatch chilies. I’m still kicking myself about this! You can’t use any old chilies for this recipe, Erin gets her chilies from her family in New Mexico. This recipe is minimal in the ingredient department so each ingredient needs to be the best. Shipping the chilies would have cost us a fortune so I had to hit up my buddy Jorge Fierro of Frida’s Bistro and Rico’s Foods for help, this all took place over Facebook of course. Jorge didn’t hesitate to help me out with the chilies. When I went down to Frida’s to pick up the chilies from Jorge we had some time to talk, standing in the middle of his Rico’s warehouse I was in awe of what he has built for himself. I asked him ‘how did this all start Jorge?’ He told me that he grew up in Mexico, moved to Rawlins, Wy to be a sheep herder and while in Wyoming he realized he needed to learn English so he moved to Utah to attend the UofU. He told me he went to school during the day and worked as a dishwasher at night, one night on the way home he stopped at the store to get tortillas and refried beans. He was horrified by the beans and started making his own and selling them at the Farmer’s Market. So simple but so impactful. Now you can find Rico’s products in all our local major grocery stores, and Frida Bistro just won Best Mexican at our Salt Lake Dining Awards this last week. As I drove away from Frida’s with my chilies I was humbled by the effort that went into making this dish happen, it took a community. OUR COMMUNITY. ENJOY!

Nutrition:

Relationships: Social connections help relieve harmful levels of stress, which can harm the heart’s arteries, gut function, insulin regulation, and the immune system.

Definition Of Community: Community usually refers to a social unit larger than a small village that shares common values. (thank you Wikipedia)

Food:

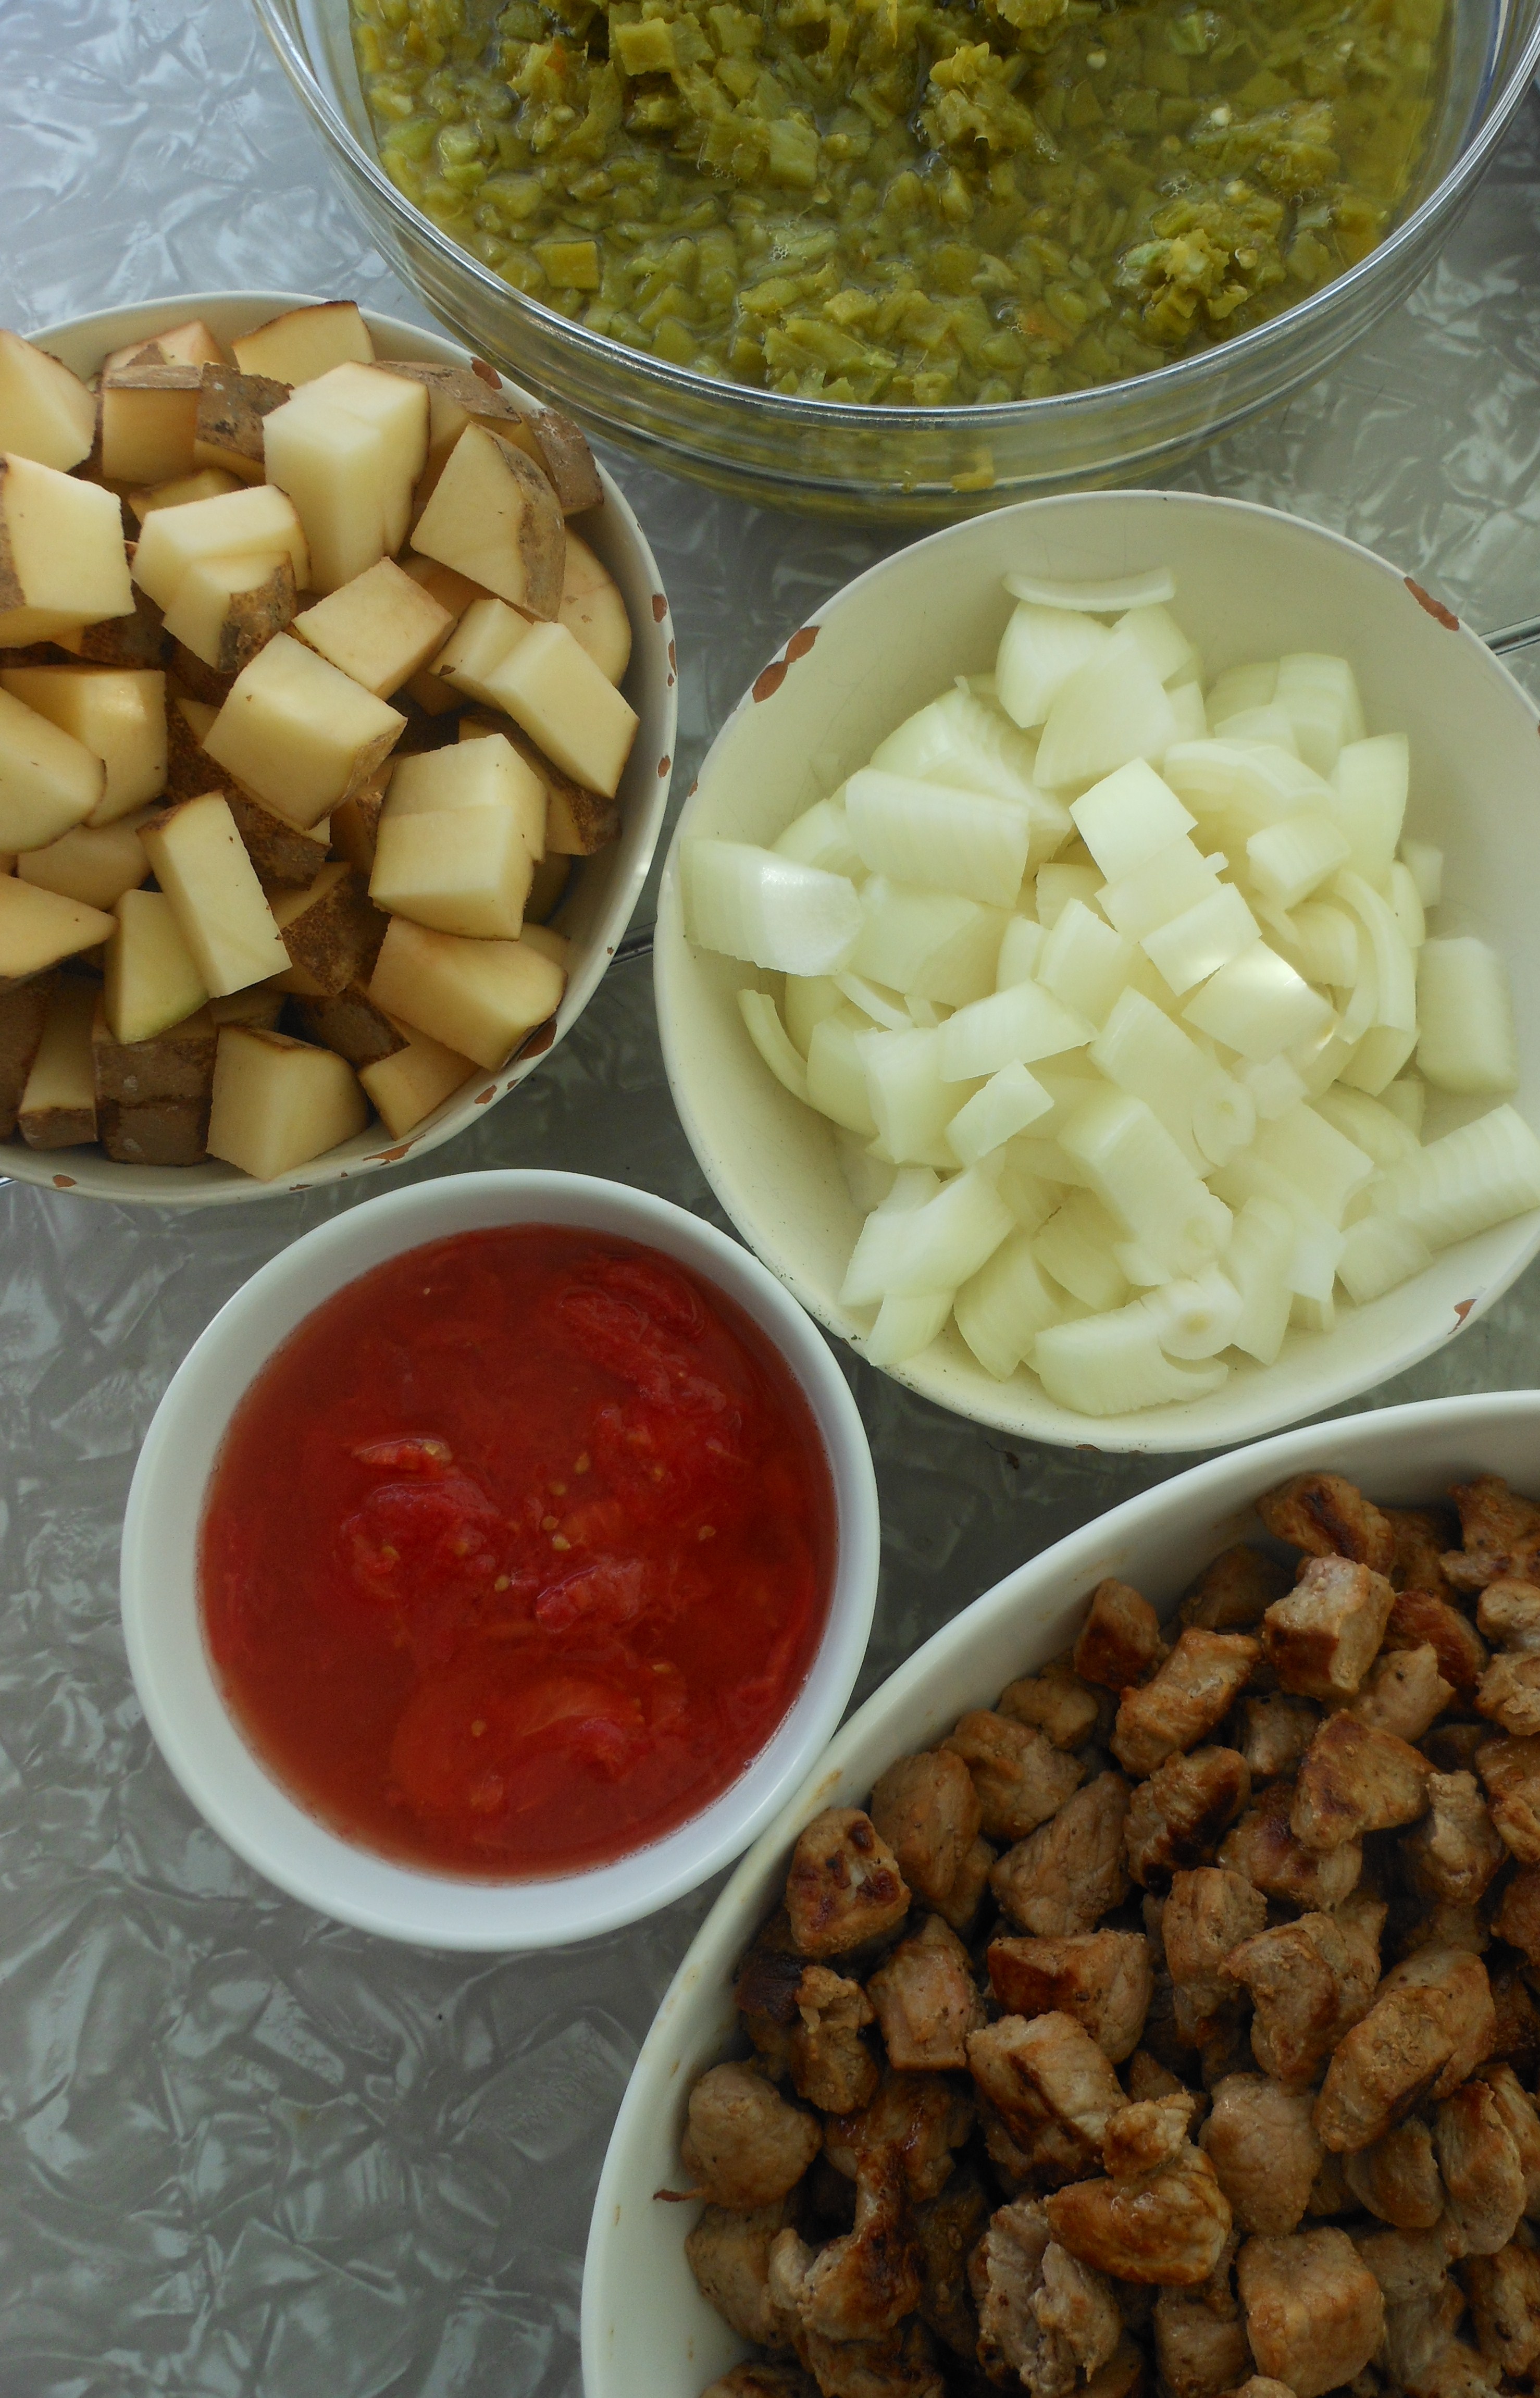
New Mexico Green Chili Pork Stew– makes a lot!

Ingredients:

4 pounds cubed pork (I used a pork shoulder from Clifford Family Farm)

4 cup roasted, peeled, seeded New Mexican Hatch Green Chiles

8 cups broth (I use chicken broth or veggie broth)

4 c. water

2 lbs tomato, peeled & cored (I used my own canned tomatoes)

4 local medium cubed potato

4 local med diced onion

8 cloves minced garlic, local

Salt to taste

DSCN2604

Directions:

1. Start by placing a heavy bottom pot on the stove over medium heat, drizzle in a little bit of oil. Saute the cubed pork in batches, until just brown on all sides. Season with salt and pepper and don’t over cook. Place the browned pork in a bowl and set aside while you cook the rest of the pork.

2. When you have finished with the pork, set aside. Drizzle a bit more oil into the heavy bottom pot and saute the onion and garlic until soft and caramel colored. Season with salt and pepper.

3. Place a big soup pot on the stove, add the sautéed pork, sautéed onions and garlic into the big soup pot. Next add all the other ingredients to the pot with the pork, onions/garlic. Bring to a boil, then turn down to a simmer and simmer away, the longer the better. (This is one of those dishes that gets better and better with time. SO GOOD!)

4. To serve: ladle pork chili into a bowl, add chopped avocado and a squeeze of lime. We topped ours with a dollop Drake Family Goat Yogurt and served a warm Rico’s tortilla on the side.

DSCN2625

Stuffed Acorn Squash

27 Sunday Jan 2013

Posted by cosmohippiechef in Events, seasonal, Side dish

≈ 2 Comments

Tags

brown rice, cheese, garlic, gluten free, kale, local, seasonal, squash, vegetables

DSCN2573

Food:

Stuffed Acorn Squash serves 5-10

5 acorn squash, cut in half seeds removed

1 lb. local grass-fed beef (I buy Lau Family Farms)

1/2- 3/4 lb mushrooms of choice, chopped (I used shiitake)

1 large onion, chopped

1 c. celery, chopped

4 garlic cloves, chopped

1 bunch of kale or swiss chard, stems removed and leaves chopped

1 T. each rosemary, thyme and sage, chopped

1 c. cooked brown rice, millet, wild rice or non-glutinous grain of choice

3/4 c. parsley, chopped and divided

1/2 c. pecorino or parmesan cheese, grated

2 T. ghee

salt and pepper

Directions:

1. Start by preheating the oven to 375 degrees. Place the prepared acorn squash cut side down on a parchment lined baking sheet. Place the squash in the oven and bake for 30 min. Take baked squash out of the oven and set aside. Turn the oven down to 350 degrees.

2. Place a large saute pan on the stove top over medium heat , add the ghee and when melted add the mushrooms and begin to saute. Don’t touch the mushrooms for a minute or so to give them time to brown. Next add the onions, celery and garlic and begin to saute with the mushrooms, salt and pepper the veggies just a bit. Saute for 5-7 minutes.

3. Next add the beef, use a potato masher to incorporate the meat into the veggies, season with a little more salt and pepper. When the beef is just about cooked, another 5-10 minutes add the rosemary, sage and thyme. Stir to combine.

4. Pull the beef and veggie mixture off the heat and add 1/2 c. chopped parsley, cooked brown rice and chopped kale, stir well to combine all the ingredients.

5. Scoop the mixture into the acorn halves, in a separate bowl combine 1/4 c. remaining parsley and cheese, season lightly. Spoon this mixture over the stuffed acorn squash (there will most likely be extra filling, save for a snack). Bake in the oven for 20 minutes or until the cheese has melted and began to brown and the mixture is warmed through. Serve hot with a drizzle of good quality olive oil. ENJOY!

Nutrition:

Grass-fed beef: http://www.laufamilyfarm.com/why-grass-fed/

Shiitake Mushrooms: These meaty flavorful mushrooms contain a substance called eritadenine, which encourages body tissues to utilize cholesterol and lower the amount circulating in the blood. Shiitake also have antiviral and anti-cancer effects.

Acorn Squash: Acorn squash is an excellent source of vitamin A, vitamin C and beta-carotene. It is also a very good source of thiamin, vitamin B6, potassium, magnesium,and manganese, and a good source of iron. It is a great seasonal choice in place of traditional bell peppers which are a late summer crop.

Love:

I made these bad boys for my Holistic Nutrition class last weekend. I wanted to show my students what eating a more plant-based Holistic diet looked like. We started with Raw Oatmeal made with Homemade Almond Milk and served it with local Drake Family Farm Goat Yogurt, our lunch item was Lentil Stew w/Kabocha squash and for dinner we had these Stuffed Acorn Squash. When people hear the word plant-based they think vegan or vegetarian, but to me it means whole foods in the natural state that are local and seasonal, not processed packaged foods. I live by a 90-10 rule, 90% of my diet consist of plant foods, this includes beans, legumes, grains, rice, nuts and seeds, and lots of fresh fruits and veggies, the other 10% leaves room for local, sustainable QUALITY animal foods, this includes local beef and chicken on occasion, wild fish, yogurt and cheese. It’s not the quantity but the quality of the choices we make, this is what Holistic Nutrition is all about. I hope you enjoy this recipe, my students sure did!

Roasted Brussels Sprout and Romanesco Soup w/ Leeks

06 Sunday Jan 2013

Posted by cosmohippiechef in seasonal, soup, vegan

≈ 6 Comments

Tags

brussels sprouts, garlic, gluten free, lemon, romanesco broccoli, seasonal, soup, vegan, vegetables

DSCN2566

Love:

I lovingly refer to this soup as “Lean Mean Green Soup.” Why you ask? The holidays are over which means most of us are trying to push the restart button on our diets, our loved ones have gone home and here in Salt Lake the inversion has set in and we are all getting sick. In an effort to ward off the dreaded cold/flu and the seasonal depression that comes out of no where in January, I whipped up this soup which is loaded with vitamins and minerals and is vegan and gluten-free. Most of the time we eat for pleasure sometimes we need to eat for our heath, lucky for all of us this Roasted Brussels Sprout and Romanesco Soup w/ Leeks supports both. Here’s to a happy healthy 2013, ENJOY!

*This soup is perfect if you are on a New Years cleanse or eating clean, if not add your favorite local cheese and you’ll have yourself a ‘broccoli cheese’ soup!

Food:

Roasted Brussels Sprout and Romanesco Soup w/ Leeks- makes a big ‘ol pot

2 leeks, cleaned and chopped (don’t use the fibrous ends)

2 c. celery chopped

2 lbs. brussels sprouts, ends trimmed and cut in half

2 lbs. romanesco, cleaned, stalk and leaves removed and cut into chunks

10 small garlic cloves, pulled away from the bulb but left in skins

2 T. olive oil (I used ghee)

4 c. organic low sodium veggie broth (homemade is best)

2. water

1 bay leaf

salt and pepper (I used pink pepper)

To finish/garnish-

Lemon olive oil (if you don’t have use regular olive oil and a squeeze of fresh lemon)

Fresh chopped parsley and cilantro

a sprinkle of real salt or celtic salt and pink pepper (you can use regular pepper)

DSCN2565

1. Pre-heat oven to 375 degrees. Line two baking sheets with parchment paper. On one baking sheet place the prepared brussels sprouts, on the other place the chopped romanesco. Drizzle both with just a bit of olive oil and sprinkle w/salt and pepper.

2. Prepare the garlic, place the 10 small cloves still in their skins but pulled away from their bulb in a piece of tin foil big enough to wrap up. Place this foil packet on one of the baking sheets. Place the brussels sprouts, romanesco and garlic foil packet in the oven and roast for 25 minutes.

3. After that 25 minutes remove the brussels sprouts and romanesco from the oven, turn off heat and leave the garlic packet in the oven for another 15 minutes. Remove and set aside until cool enough to handle, then remove the roasted garlic from their skins, discard the skins and reserve the garlic to be used in the soup.

4. Heat your favorite soup pot over medium heat. Add 2 T. olive oil and the leeks, stir and season with salt and pepper. When the leeks begin to soften and get fragrant add the celery, stir to combine and season with a bit more salt and paper. After 5-7 minutes add the roasted brussels sprouts, romanesco and garlic. Stir to combine. Add the veggie broth, water and bay leaf. Bring mixture to a boil, turn heat down to low, place the lid on the pot and simmer for 20 minutes.

5. When the soup has simmered for 20 minutes pull pot off the heat. Let cool just a bit. Working in batches puree the soup and return it to the soup pot. Keep warm or eat immediately. Check for seasoning, garnish and EAT!

DSCN2556

Nutrition:

Brussels Sprouts: Brussels sprouts are loaded with vitamin K which promotes healthy bones, prevents calcification of the body’s tissues and serves as an antioxidant and anti-inflammatory agent, essential for proper brain and tissue function. One cup of brussels sprouts contain 161% of our daily dose RDA of vitamin C which ensures a healthy immune system. They also contain over 20% of our RDA for vitamin A which also helps boost our immune systems. One cup of brussels sprouts contains almost 25% of our RDA for folate. A biochemical event called methylation cycle relies folate to properly transcribe DNA, transform norepinephrine into adrenalin as well as transform serotonin to melatonin. (Translation- keeps us feeling happy!)

Romanesco: Helps fight viral infections, protects from free radicals, improves healing, HELPS PROTECT FROM COLDS AND FLU, reduces depression.

*My other favorite go to immune boosting soup is my Homemade Chicken Soup

Homemade Sweet Potato Falafel and Homemade Naan

16 Sunday Dec 2012

Posted by cosmohippiechef in beans, DIY, seasonal, vegan

≈ 4 Comments

Tags

beans, garlic, gluten free, lemon, parsley, seasonal, squash, vegetables

DSCN2529

Food:

Sweet Potato Falafel makes about 18 (Adapted from My New Roots)

2 medium sweet potatoes (orange inside), roast on a baking sheet lined with parchment @375 for about 1 hour or tender inside

1 1/2 teaspoons ground cumin

2 small cloves of garlic, chopped, plus 2 t. Laziz Toum (garlic condiment)

1/2 teaspoons ground coriander

2 big handfuls of fresh cilantro/coriander, chopped

Juice of half a lemon

a scant cup chickpea flour, (you can buy or make your own by placing 1 1/2c. chickpeas in blender and grind yourself. Be sure to sift before using)

salt and pepper

Pinch of cinnamon and nutmeg (about 1/2 t. each

Gomashio for topping

Directions:

1. After you have roasted your sweet potatoes and they are cool enough to handle, peel and place in a bowl. Smash with the back of a fork, next add all the rest of the ingredients EXCEPT the gomashio. Stir to combine. Taste for salt and pepper and add more if needed. Place in the fridge for at least 30 minutes for the mixture to firm up.

2. Take the sweet potato mixture out of the fridge, using a medium size cookie scoop, scoop the sweet potato mixture out a scoop at a time. I like to flatten mine into an oval shape. Place on a baking sheet lined with parchment. Sprinkle with gomashio (if you don’t have gomashio roll the falafel in sesame seeds). Bake in the oven @400 degrees for 20-25 minutes or until golden and slightly crispy. Take out and let cool just a bit.

DSCN2515

DSCN2517

Homemade Naan makes 8 (recipe from the magazine Homemade Bread)

2 tsp. sugar (I like sucant)

1 c. warm water (105-115 degrees F)

1 1/2 tsp. active-dry yeast

3 c. all-purpose flour (I used organic whole wheat flour)

1 tsp. salt

3 T. yogurt (I used buttermilk it’s what I had on hand)

6 T. ghee (clarified butter-love!)

Directions:

1. Dissolve the sugar in warm water, add yeast. Set aside until foamy about 10 minutes.

2. Mix the flour and salt in a large bowl. Add the yeast mixture and yogurt. Using your fingertips, mix with the dry ingredients until a soft dough forms.

3. Turn dough out onto a floured surface, knead it until it is smooth and elastic. Form dough into a ball.

4. Oil a large mixing bowl, roll the ball of dough in it until the surface of the dough is oiled. Cover with plastic wrap and let dough rest in the bowl until it has doubled-about an hour.

5. Place a cast iron griddle or skillet in the oven and preheat to 400 degrees (I used a pizza stone).

6. Turn the risen dough onto a floured surface, and knead for 10 minutes (I know a long time but it’s totally worth it!). Divide the dough into eight equal sized round balls. Pat each ball between your palms or an on a lightly floured surface until you have an oval about 5×7 inches in size. Apply ghee to each oval with your fingers or a pastry brush, sprinkle with salt.

7. Place naan on the hot cast iron griddle (I used a pizza stone, and I cooked 2 naan at a time) oe skillet until they puff and brown lightly- about 5 minutes. Flip each naan, apply a bit more ghee and bake about 2 more minutes.

8. Remove from the oven and serve hot!

DSCN2520

DSCN2521

Putting them together:

1. Homemade falafel

2. Homemade naan

3. Parsley and cilantro leaves

4. Sunbridge sunflower sprouts

5. Laziz Hummus and Muhamara

DSCN2523

DSCN2526

I cut 1 naan in half, slather hummus on one side and muhamara on the other. Sprinkle parsley and cilantro on one side and sunflower sprouts on the other. I cut the falafel in half and lay them on one side, top with the other side. EAT!

Nutrition:

Sweet Potato: Sweet potatoes contain unique root storage proteins, which have been shown to exert  significant antioxidant effects. The presence of these proteins, along with the high content od carotenes and vitamin C, makes sweet potatoes a valuable food for boosting antioxidants in your body. Sweet potatoes have been shown to help stabilize blood sugar levels and improve the response to hormone insulin.

Chickpeas: Garbanzo beans are a good source of fiber, folic acid and manganese. They are also a good form of protein as well as minerals such as iron, magnesium, copper and zinc. Garbanzo beans can help lower cholesterol and improve blood sugar levels making them a great food for diabetics and insulin-resistant individuals. If served with high quality grains, garbanzo beans are an extremely low-fat complete protein.

Love:

This blog post is LOADED! It is very involved but the work is worth the end result. There is a number of reasons I wanted to get this post on the blog.

1. I have made these falafel a number of times last fall and fell in love with how simple they are. You can make a sandwich with them or a salad. Quick, easy and great to have on hand. They are from one of my favorite blogs, My New Roots.

2. If you haven’t met Moudi and Derick the (cute) men behind Laziz you’ve been under a rock. They are all over the place right now showcasing their wonderful products. You can find them at a number of Farmers Markets as well as some of our great local retailers from Harmon’s to Liberty Heights Fresh. Their hummus is creamy, their muhamara is just the right amount of sweet and spice and their Toum (garlic condiment) is like nothing you’ve ever had- think straight garlic mashed with olive oil and lemon. Translation- YUM!

3. I was totally inspired my one of my local fellow bloggers Becky over at Vintage Mixer. I told her we must have been on the same wave length with our cooking, she made lamb falafel and homemade pita bread. She also highlighted Laziz.

4. I have been on a kick of making my own bread. Every year I try to learn a new skill from roasting my own chicken, making my own almond milk or learning to make beans from scratch. Bread is my project this winter and getting to make homemade naan for these falafel was so gratifying.

Whole foods are always best, yes it takes more time to make things from scratch BUT the quality, flavor and nutritional value are far greater than anything you can buy. For me there is no greater joy than tackling a great new recipe and there is also no greater joy than being inspired by the wonderful people around me.  ENJOY!

Bean and Bacon Soup w/ Crispy Sage

08 Saturday Dec 2012

Posted by cosmohippiechef in beans, seasonal, soup

≈ 2 Comments

Tags

beans, garlic, gluten free, local, parsley, seasonal, soup, squash, vegetables

DSCN2116

Food:

Bean and Bacon Soup w/ Crispy Sage makes a lot! (About 20 cups!)

5 c. carrots, chopped

5 c. celery chopped

5 c. butternut squash, peel, seed and cube (leftover from summer’s farmers market)

2 large onions, chopped

5 garlic cloves, chopped (left over from summer’s farmers market)

1 T. each thyme and rosemary, chopped (I used Kenyon Organics)

20 sage leaves (Kenyon Organics)

1/2 Clifford Family Bacon, chopped (if vegan or vegetarian sub coconut oil 2-4 T.)

5 c. broth (I used the broth I made from the thanksgiving turkey bones)

5 c. water

1 c. chopped parsley

2 bay leaves

salt and pepper

8 c. cooked beans, recipe to follow*

Directions:

1. Place a LARGE soup pot on the stove top over medium heat. Start by sautéing the bacon until crisp, spoon out and drain on paper towel. (If you are using oil and not bacon heat the oil over medium heat until hot and then proceed). Throw in the sage leaves and cook until just browned, careful not to burn. Spoon out and drain on paper towel.

2. Next saute the carrots, onions and celery in the leftover bacon oil. Season with salt and pepper. Toss until the veggies to soften, maybe 5-8 minutes. Next add the butternut squash, garlic, thyme and rosemary, season with a bit more salt and pepper (just a little you can always add more!). Toss again, then place lid on the pot and sweat the veggies for about 10 minutes.

3. After that 10 minutes with the lid on, take off lid and add, broth (any kind you like), water, beans and bay leaves. Bring to a boil, turn heat to medium low and simmer for 20-30 minutes.

4. Check to make sure butternut squash is tender, check for salt and pepper, add more if needed. If all is good pull soup of the heat and add the parsley. Stir to combine.

5. Serve piping hot, garnish with crispy bacon and sage. Drizzle with olive oil and a sprinkle of Parmesan cheese.

DSCN2511

DSCN2512

*Basic beans

DSCN2020

1. Cooking your own beans is easy, cheaper and healthier! Soak three cups of your favorite beans in water overnight (at least 20 hours). For this soup I would suggest white beans, garbanzo beans, or I used these gorgeous adzuki beans I scored at the farmers market this summer.

2. Drain the beans, place them in heavy bottom pot and cover with enough water to cover about two inches above the beans. Throw in a finger long piece of kombu (kombu is a sea vegetable that helps tenderize the beans and adds minerals. You can find kombu at most health food stores or asian markets). Bring beans to a boil and let boil for 5 minutes, skim any foam that forms on the top. Then turn down heat to medium low, place lid on the pot and simmer for 1 hour to 1 1/2 hours depending on the beans. You’ll need to check them, you do this by taking one out and lightly smashing it with your finger, if it does this effortlessly they are done.

3. When done, turn off heat and let them cool. Drain. Ready to use!

Nutrition:

Beans- Adzuki beans are not only high in protein but easier to digest than most beans. Surpassed in importance by the soybeans. Adzuki beans are an excellent source of fiber and protein. They are also rich in vitamins, folic acid, B3, a very good source of B1, B6 and B2. Rich in high levels of trace minerals molybdenum, copper, manganese and zinc. In addition to supplying high levels od soluble fiber and protein the trace mineral molybdenum which is necessary for the production of an enzyme called sulfite oxidase, one of the most important enzymes in a liver detoxification pathway called sulfoxidation. Poor sulfoxidation is associated with neurodegenerative diseases such as Parkinson’s and Alzheimer’s disease and with inflammatory conditions, including rheumatoid arthritis, delayed food sensitivity, multiple chemical sensitivities, and diet-responsive autism. Food is so powerful, eating a variety and an abundance of plant-based nutrient dense foods is vital for a happy healthy life.

Love:

I am a sucker for soup, especially this time of year. The first time I made this soup was for Sunday dinner with friends a week before we left for Italy, the best part is that I had just attended our last farmers market of the season and ALL my ingredients were local! The whole time I was in Italy I yearned for a bowl of soup, I couldn’t wait to get home and make another batch of this Bean and Bacon Soup w/ Crispy Sage. Soup to me is love, love for veggies, love for beans and love for a bowl of warmth. I have mentioned before that I think soup is the perfect lunch, I made it for this last weeks lunches. This soup is portable, full of vegetables, protein and light put filling. This batch made so much I froze some for one of those weeks I might just need a break from cooking. Soup is love. Whip up a pot and love and sit back and ENJOY!

Bok Choy Quinoa Soup with Miso, Herbs and Lime

25 Tuesday Sep 2012

Posted by cosmohippiechef in quinoa, soup, vegan

≈ 4 Comments

Tags

bok choy, garlic, ginger, gluten free, miso, quinoa, soup, vegan

Food:

Bok Choy Quinoa Soup with Miso, Herbs and Lime- 4 servings

4 c. veggie broth (I used homemade, *recipe to follow)

4 c. water

3 c. cooked quinoa

4-6 baby Bok choy, cleaned and chopped

2 large cloves of garlic, peeled and cut in half

2 inch long pieces of ginger, peeled and cut in half

1 Fresno chile, chopped (remove seeds if you don’t want it to spicy)

1 tsp. coconut oil

1/4 c. Bragg’s Liquid Amino’s (you could use tamari or low sodium soy sauce)

1/4 c. mirin (rice cooking wine, find in the international isle)

2 T. chopped mint

2 T. chopped parsley

2 T. chopped cilantro

1/4 c. scallions, chopped and divided

2 limes, one for the broth and the other divided into 4 wedges for garnish

4 tsp. unpasteurized miso (I like Westbrae Natural Organic Mellow Red Miso)

*sesame oil and or chile oil to drizzle on top

*Gomashio to sprinkle on top

Directions:

1. Place a medium size soup pot on stove over medium heat. Add the coconut oil, when the coconut oil is warm add the garlic and the ginger. Let the garlic and ginger brown on each side for just a minute. When the garlic and ginger are toasty add the Fresno chile and saute for another minute. When the Fresno chile becomes fragrant and browned just a bit add the veggie broth and water. Bring to a boil, then turn down the heat to a simmer and simmer for 20 minutes, add 2 T chopped scallions.

2. While you are waiting for the broth, divide the Bok choy and the cooked quinoa (3/4 c. each) between 4 bowls (don’t worry the broth will wilt the Bok choy just enough). In another bowl mix together the chopped mint, parsley, cilantro and scallions. Divide the herb/scallion mixture between the 4 bowls.

3. When the broth has simmered for 20 minutes fish out the garlic cloves, place them on your cutting board and smash them with a fork. Add the smashed garlic back to the broth along with the Bragg’s Liquid Amino’s and the mirin and simmer for another 5-10 minutes.

4. When you have simmered the broth for the last time take the soup pot of the heat and whisk in the miso (heat will kill all the good stuff in miso this is why it is important to remove from the heat before adding) and the juice of one lime. Divide the broth between the four bowls and garnish with sesame oil and or chile oil, a little gomashio and a wedge of lime. EAT IMMEDIATELY! (or place in individual containers like I did for lunch…mmm!)

*Homemade Veggie Broth

I like to make my veggie broth with whatever I have hanging out in the fridge at the end of the week, this week it was…

Carrots, celery, onions, scallions, bell peppers, garlic and broccoli stems.

Then I added, fresh swiss chard and tomatoes from my garden along with parsley and cilantro stems.

Add a gallon of water and 1 T. each of celtic gray salt and white peppercorns. Simmer for three hours. Let cool. Strain through a colander and then through a fine mesh strainer. Store in freezer safe bags in the freezer until ready to use. My last batch made 9 c. of veggie broth!

Nutrition:

Ginger- Ginger is a classic tonic for the digestive tract. It stimulates digestion and keeps intestinal muscles toned. Is an anti-inflammatory agent, it also helps support healthy cardiovascular system.

Garlic- Broad-spectrum antibiotic that combats bacteria, intestinal parasites and viruses. Lowers blood pressure and blood cholesterol, discourages dangerous blood clotting. Contains multiple anti-cancer compounds, antioxidants, and tops the National Cancer Institutes list of potential cancer preventative food. Great for colds and helps boost immune system.

Parsley- A blood builder and purifier, good for stimulating brain activity. High in iron and rich in copper and manganese. Helps release retained water from the body.

Cilantro- Helps to eliminate the heavy metal build up of mercury and lead from the bones and the tissues in the body.

Mint- Great for an upset stomach, helps soothe the intestines.

Miso- Is rich in active enzymes and probiotics, or friendly bacteria.

Love:

This soup is very similar to my other recipe The Soup which is a staple in my house. But what I like about this version is that it is a great transitional soup from summer to fall and fall to winter. It is very light because of the quinoa and Bok choy but warm from the spicy ginger, garlic and Fresno chile, soothing from the herbs and has fresh kick from the lime. I like to believe it is very healing like Homemade Chicken Soup but a vegetarian or vegan version. I made this for our lunches this week and what I great idea that was considering the last two days have been a little cooler. I was happy to get my garlic, herbs and Bok choy from the Farmers Market this last weekend.  I hope you are all starting to slow down a bit like us, this soup is a good place to start. ENJOY!

Summer Sides- Potato Zucchini Bake & Raw Corn Salad

30 Monday Jul 2012

Posted by cosmohippiechef in salad, seasonal, Side dish

≈ Leave a comment

Tags

cheese, corn, garlic, gluten free, herbs, local, potatoes, salad, seasonal, squash, tomatoes, vegetables

Food:

Potato Zucchini Bake 6-9 servings

2 c. cubed red potatoes (farmers market)

2 c. cubed zucchini (farmers market)

4 small shallots, chopped (Big Papa’s garden)

1/4- 1/2 c. chopped parsley (my garden)

1/4-1/2 c. chopped mint (farmers market)

6 oz Aggiano Beehive Cheese, cubed (farmers market)

salt and pepper to taste

Directions:

1. Preheat the oven to 365 degrees. In a large bowl mix the potatoes, zucchini, shallots, cheese, mint and parsley. Season liberally with salt and pepper. Toss again.

2. Pour the mixture into your favorite medium size baking dish. Press the mixture into the dish to even it out and compact it just a bit.

3. Bake for 45 minutes or until the top is slightly brown and the cheese is super melty. Cool just a minute and serve warm.

Raw Corn Salad serves 6

6 ears of raw corn, cut the kernels from the cob (farmers market)

1- 1 1/2 c. cherry tomatoes, halved (my garden)

1 cucumber, peeled, seeds removed and diced (farmers market)

1-2 garlic cloves, minced (farmers market)

1/4 c. chopped basil (my garden)

2 T. Slide Ridge Honey Vinegar

1 T. olive oil

salt and pepper to taste

1. Place the raw corn kernels, tomatoes, cucumber, garlic and chopped basil in a bowl. Toss lightly.

2. In a separate bowl mix together the vinegar and olive oil. Season to taste with salt and pepper.

3. Drizzle the vinegar/olive oil mixture over the corn mixture and toss lightly. Refrigerate for at least 1 hour and serve chilled.

Love:

Pictured above is the two summer sides and McDowell Family Farm grilled chicken. Does summer get any better than this? I don’t think so. We also had a High West Vodka Lemonade- yum! Summer is all about fresh local ingredients and these side dishes are full of just that. The Raw Corn Salad is fresh and sweet, the Potato Zucchini Bake is full flavored and comforting, perfect with grilled chicken. I hope one of these dishes shows up at your next get together.

Pineapple Pad Thai w/Crispy Tofu

30 Monday Apr 2012

Posted by cosmohippiechef in pasta, vegan

≈ 4 Comments

Tags

garlic, gluten free, pasta, peas, tofu, vegan

Food:

Pineapple Pad Thai– Serves 2 (with leftover sauce)

Sauce:

1/2 cup almond butter (I used my DIY Almond/Walnut Butter)

2 T. water

2 T. liquid aminos (soy sauce of your choosing)

2 limes, zest and juice

2 T. apple cider vinegar

2 tsp. Thai red curry paste

2 tsp. coconut oil

1/2 c. fresh pineapple juice

1. All of the ingredients go into a small saucepan, heat over medium low heat and whisk to combine. Heat through till there are no lumps. Serve.

The dish:

1 package brown rice noodles, cooked

1 c. peas, steamed

Green onions/scallions, chopped

Limes, to garnish

Cilantro, chopped

Crispy Tofu

1. After you have cooked the noodles put them in a bowl big enough to mix in. Pour some of the sauce over the noodles and toss well to combine. Divide between 2 bowls and garnish with the peas, crispy tofu, scallions, cilantro and a lime wedge.

Crispy Tofu (adapted from a secret recipe book)

5 T. liquid aminos

3/4 c. water

2 garlic cloves

1 lime, juiced

3 tsp. sesame oil

1/2 fresh pineapple juice

1 package firm tofu (look for no GMO’s)

1 T. fresh ginger

1. All of the ingredients EXCEPT the tofu go into the food processor or blender. Blend until there are no chunks of garlic or ginger.

2. Cube the tofu, pour the sauce over the cubed tofu and marinate over night.

3. Bake at 375 for 20-25 minutes. Keep and eye on the tofu and turn a few times while cooking. You be the judge of how crispy you want your tofu. Eat as a snack or add to Pineapple Pad Thai, great in salad and stir-frys.

Nutrition:

Sometimes (healthy) comfort is the only nutrition we need!

Love:

My sweetie loves Pad Thai w/Tofu! Sometimes after a long day I’ll call and say ‘wanna get Thai tonight?’ Billy is quick to oblige. This means noodle soup w/veggies for me, which is like a grown up version of Top Ramen, but on a whole other level with its spicy broth and chunks of garlic lingering in the bottom of the bowl. For Billy this means Pad Thai w/Tofu and a side of peanut sauce, he LOVES his peanut sauce! As we are both enjoying our slurpy noodles and pretending we are on some kind of exotic vacation (not!) it hits me that I SHOULD MAKE MY OWN PEANUT SAUCE for my sweetie- BRILLENT idea Brooke! To the kitchen I go. It took me a few attempts, all of which Mr. William didn’t mind testing, but this Pineapple Pad Thai was my favorite and I feel is ‘blog worthy’.  It’s a goodie. Enjoy!

Roasted Bell Pepper Tapenade

03 Saturday Mar 2012

Posted by cosmohippiechef in appetizer, Side dish, vegan

≈ Leave a comment

Tags

bell peppers, garlic, gluten free, olives, vegan, vegetables

Food:

Roasted Bell Pepper Tapenade

3 orange bell peppers, roasted, skins and seed removed*, chopped

1/4c. purple onion, chopped

1 large garlic clove, chopped

1/4c. parsley, chopped

1/4c. olives, chopped (I used green olives that I got at Tony Caputo’s)

2 T. capers

2 T. olive oil

2 T. balsamic vinegar

salt and pepper to taste

Directions:

*How to roast peppers: Turn the broiler in your oven to high. Place the peppers on a baking sheet, when oven is ready place the baking sheet on the rack in the oven as close to the broiler without touching. Set a timer for 5 minutes, then rotate. Do this a total of four times (20 min) until all the sides of the pepper are charred. Watch carefully!!! Take the charred peppers out of the oven and place in a paper bag, close and let cool about 10 minutes. Take the peppers out of the bag and remove the skin, pull off stem, clean out the seeds. Use in whatever recipe calls for roasted peppers.

1. Place your roasted bell peppers in a medium size dish.

2. In a separate bowl mix purple onion, garlic, olives and capers. Add this mixture to the roasted bell peppers. Next add the chopped parsley.

3. Add the balsamic vinegar and olive oil to the above ingredients. Mix well and season with salt and pepper. I served mine with Homemade Goat Milk Ricotta Cheese and bread (this would be great over pasta). Enjoy!

Nutrition: 

Bell Peppers- Bell peppers are one of the most nutrient-dense foods available, it a good source of a large number of nutrients, including vitamin C, beta-carotene, vitamin K, thiamine, folic acid and vitamin B6. They are also a good source of phytochemicals with exceptional antioxidant activity. The substances in bell peppers has been shown to prevent blood clot formation and reduce the risk of heart attacks and strokes.

Parsley– Extremely rich in a number of nutrients including chlorophyll and carotenes. Parsley is a good source of vitamin C, folic acid and iron. It is also a good source of minerals including magnesium, calcium, potassium and zinc.

Olives- Olives are a healthy fat containing an excellent source of oleic acid an omega-9 monounsaturated fatty acid. They are also a great source of vitamin E. Olives are a staple in Mediterranean areas where people don’t consume a lot of animal fats, thus getting the most out of these super healthy fats.

Love:

I was looking for something easy and fresh to go with the Homemade Goat Milk Ricotta Cheese I was attempting to make for our Oscar’s party on the couch. I make a version of this dish with fresh tomatoes in the summer, but during the winter the only tomatoes I want to eat are the ones I canned in the summer. The roasted bell peppers worked great, I used orange bell peppers because red bell peppers and I don’t get along. As I was posting this recipe I thought how good this tapenade would be over pasta with the Goat Milk Ricotta crumbled over the top, I’ll have to try that next.

P.S. This will make a great dish in the summer because we can roast the peppers on the BBQ! I can’t wait!

Hummus Dressing

18 Saturday Feb 2012

Posted by cosmohippiechef in dips, DIY, dressing, salad, vegan

≈ Leave a comment

Tags

garlic, gluten free, lemon, salad, vegan

Food:

Hummus Dressing- makes 1 1/4c.

2 scallions (green onions), chopped white and greens

1 garlic clove, chopped

1 lemon, zest and juice

1/4c. parsley, chopped

1/4c. tahini (I use Artisana Raw Tahini)

1/2c. canola oil or olive oil (I used a combo of both)

1 tsp. cumin

1/8 tsp. cayenne pepper

1/4 tsp. salt

1/4 tsp. garlic salt

1/4 tsp. onion powder

1/4c. water

Directions:

1. Place the scallions, garlic, parsley, lemon juice and zest in the food processor, pulse to combine. Next add tahini, cumin, cayenne, salt, garlic salt and onion powder to the pulsed mixture and pulse again to combine.

2. With the motor running add the oil until combined. Turn off, scrape down sides. With the motor running again add the water. If you think you need more, add it until you get the desired consistency.

3. Taste for seasoning and then store in a container and refrigerate.

Nutrition:

Tahini- Tahini is a ground sesame seed paste, similar to peanut butter. It is a creamy, oily, and smooth nut butter rich in calcium and iron.

Lemon- Lemons are a good source of vitamin C, B6, potassium, folic acid, flavonoids and the important  phytochemical limonene.

Parsley- Extremely rich in a number of nutrients including chlorophyll and carotenes. Parsley is a good source of vitamin C, folic acid and iron. It is also a good source of minerals including magnesium, calcium, potassium and zinc.

Olive oil- Healthy oils are important in the prevention and treatment of asthma, arthritis and cancer. Healthy oils are important for lowering systemic inflammation. Research has shown that women who regularly ingest olive oil have a smaller risk of breast cancer.

Love:

Lately I have been getting request from friends like, “can you develop an app for my phone of your blog, so that I can just click on it and it tell me what to make for dinner.” Maybe someday! Or “hey can you break down the nutrition stats for each recipe, example fats, carbs, protein, etc?” I wish! That takes more time than you think. But the other day I got a request that I thought was doable, my client Cindy is in love with this ‘hummus dressing’ from Trader Joe’s. Well, we don’t have a Trader Joe’s so she asked me if I could work on a recipe for her craving. I did just that, VOILA! Hummus Dressing. I think this will work just fine, just before I got started on the recipe I sent my friend Sadie in California a text that read “if you go to Trader Joe’s today can you look for ‘hummus dressing’ and take a picture of the ingredient label for me? Thanks.” My under cover mission worked and guess what? My version was much healthier and I was happy to finally meet one of these request.

← Older posts
Newer posts →

Like me on Facebook

Like me on Facebook
Follow Me on Pinterest

Recent Posts

  • Leftover Local Turkey, Apple, Potato and Smoked Gouda Salad w/Cranberry Mustard Vinaigrette
  • Spiced Apple Zucchini Muffins (Cupcakes) w/Chai Buttercream Frosting
  • Oat Free Granola- Seasonal Fruit and Local Goat Yogurt Breakfast Parfaits
  • Cherry, Quinoa, Goat Cheese Salad w/Honey Wine Shallot Mustard Vinaigrette
  • Rhubarb Ginger- Mint Lime Shrub

Archives

Categories

Tags

almond meal apples arugula asparagus bananas beans beets bok choy bread broccoli brown rice brussels sprouts cauliflower cheese chicken chilies chocolate cilantro coconut coconut milk corn dates eggs Farro fish fruit garlic ginger gluten free goat cheese goat yogurt green onions greens herbal honey hummus juicing kale lemon lentils liquor local mexican mint miso nuts oats onions parsley pasta peaches peanut butter peas potatoes pumpkin quinoa radishes raw rhubarb salad seasonal seeds soup spinach squash strawberries tart dried cherries tofu tomatoes turmeric vanilla vegan vegetables walnuts zucchini

Enter your email address to follow this blog and receive notifications of new posts by email.

Join 126 other subscribers

RSS Cosmo Hippie Chef

  • Leftover Local Turkey, Apple, Potato and Smoked Gouda Salad w/Cranberry Mustard Vinaigrette
  • Spiced Apple Zucchini Muffins (Cupcakes) w/Chai Buttercream Frosting
  • Oat Free Granola- Seasonal Fruit and Local Goat Yogurt Breakfast Parfaits
  • Cherry, Quinoa, Goat Cheese Salad w/Honey Wine Shallot Mustard Vinaigrette
  • Rhubarb Ginger- Mint Lime Shrub
  • Honey Sriracha
  • Gluten-Free Coconut Cornbread Trifles w/ Fresh Starwberries, Lemon Curd and Coconut Whip Cream
  • White Girl Kimchi
  • Farmers Market Egg Sandwich- It’s What’s for Lunch
  • Ginger Tofu Miso Ranch- Turmeric Mint Lime Vinaigrette

Spring SuperFoods

Spring Comfort

Spring Green

Spring Fresh

Spring Raw

Spring Love

Spring Clean

Anytime Classic

Anytime Comfort

Anytime Classic

Anytime Comfort

Classic

Classic

Classic

Classic

Classic

Classic

Foodies Search Here:

Like me on Facebook

Like me on Facebook

Recent Posts:

  • Leftover Local Turkey, Apple, Potato and Smoked Gouda Salad w/Cranberry Mustard Vinaigrette
  • Spiced Apple Zucchini Muffins (Cupcakes) w/Chai Buttercream Frosting
  • Oat Free Granola- Seasonal Fruit and Local Goat Yogurt Breakfast Parfaits
  • Cherry, Quinoa, Goat Cheese Salad w/Honey Wine Shallot Mustard Vinaigrette
  • Rhubarb Ginger- Mint Lime Shrub

Categories

Archives

  • December 2014 (1)
  • November 2014 (1)
  • October 2014 (1)
  • June 2014 (3)
  • May 2014 (1)
  • April 2014 (2)
  • March 2014 (2)
  • February 2014 (1)
  • January 2014 (3)
  • December 2013 (2)
  • November 2013 (3)
  • October 2013 (7)
  • September 2013 (4)
  • August 2013 (3)
  • July 2013 (3)
  • June 2013 (4)
  • May 2013 (1)
  • April 2013 (4)
  • March 2013 (5)
  • February 2013 (4)
  • January 2013 (4)
  • December 2012 (3)
  • October 2012 (1)
  • September 2012 (3)
  • August 2012 (3)
  • July 2012 (5)
  • June 2012 (2)
  • May 2012 (2)
  • April 2012 (4)
  • March 2012 (7)
  • February 2012 (13)
  • January 2012 (9)
  • December 2011 (2)
  • November 2011 (3)
  • October 2011 (8)
  • September 2011 (1)
  • August 2011 (5)
  • July 2011 (9)
  • June 2011 (13)
  • May 2011 (8)
  • April 2011 (14)
  • March 2011 (8)
  • February 2011 (4)
  • January 2011 (5)
  • November 2010 (7)
  • October 2010 (2)
  • August 2010 (4)
  • June 2010 (8)
  • May 2010 (3)
  • April 2010 (10)
  • March 2010 (4)
  • February 2010 (1)
  • January 2010 (4)
  • November 2009 (3)
  • October 2009 (3)
  • September 2009 (9)
  • August 2009 (1)
  • July 2009 (4)
  • June 2009 (8)

Blog at WordPress.com.

Privacy & Cookies: This site uses cookies. By continuing to use this website, you agree to their use.
To find out more, including how to control cookies, see here: Cookie Policy
  • Subscribe Subscribed
    • Cosmo Hippie Chef
    • Join 126 other subscribers
    • Already have a WordPress.com account? Log in now.
    • Cosmo Hippie Chef
    • Subscribe Subscribed
    • Sign up
    • Log in
    • Report this content
    • View site in Reader
    • Manage subscriptions
    • Collapse this bar
 

Loading Comments...