• About
  • Nutrition Services
  • Upcoming Classes

Cosmo Hippie Chef

~ Local Seasonal Food, Nutrition, Love

Cosmo Hippie Chef

Tag Archives: vegetables

White Girl Kimchi

24 Thursday Apr 2014

Posted by cosmohippiechef in appetizer, DIY, gluten-free, Side dish

≈ 1 Comment

Tags

cabbage, chilies, garlic, ginger, gluten free, green onions, vegetables

DSCN3806Food:

Disclaimer- the title of this post is not intended to offend or be disrespectful.

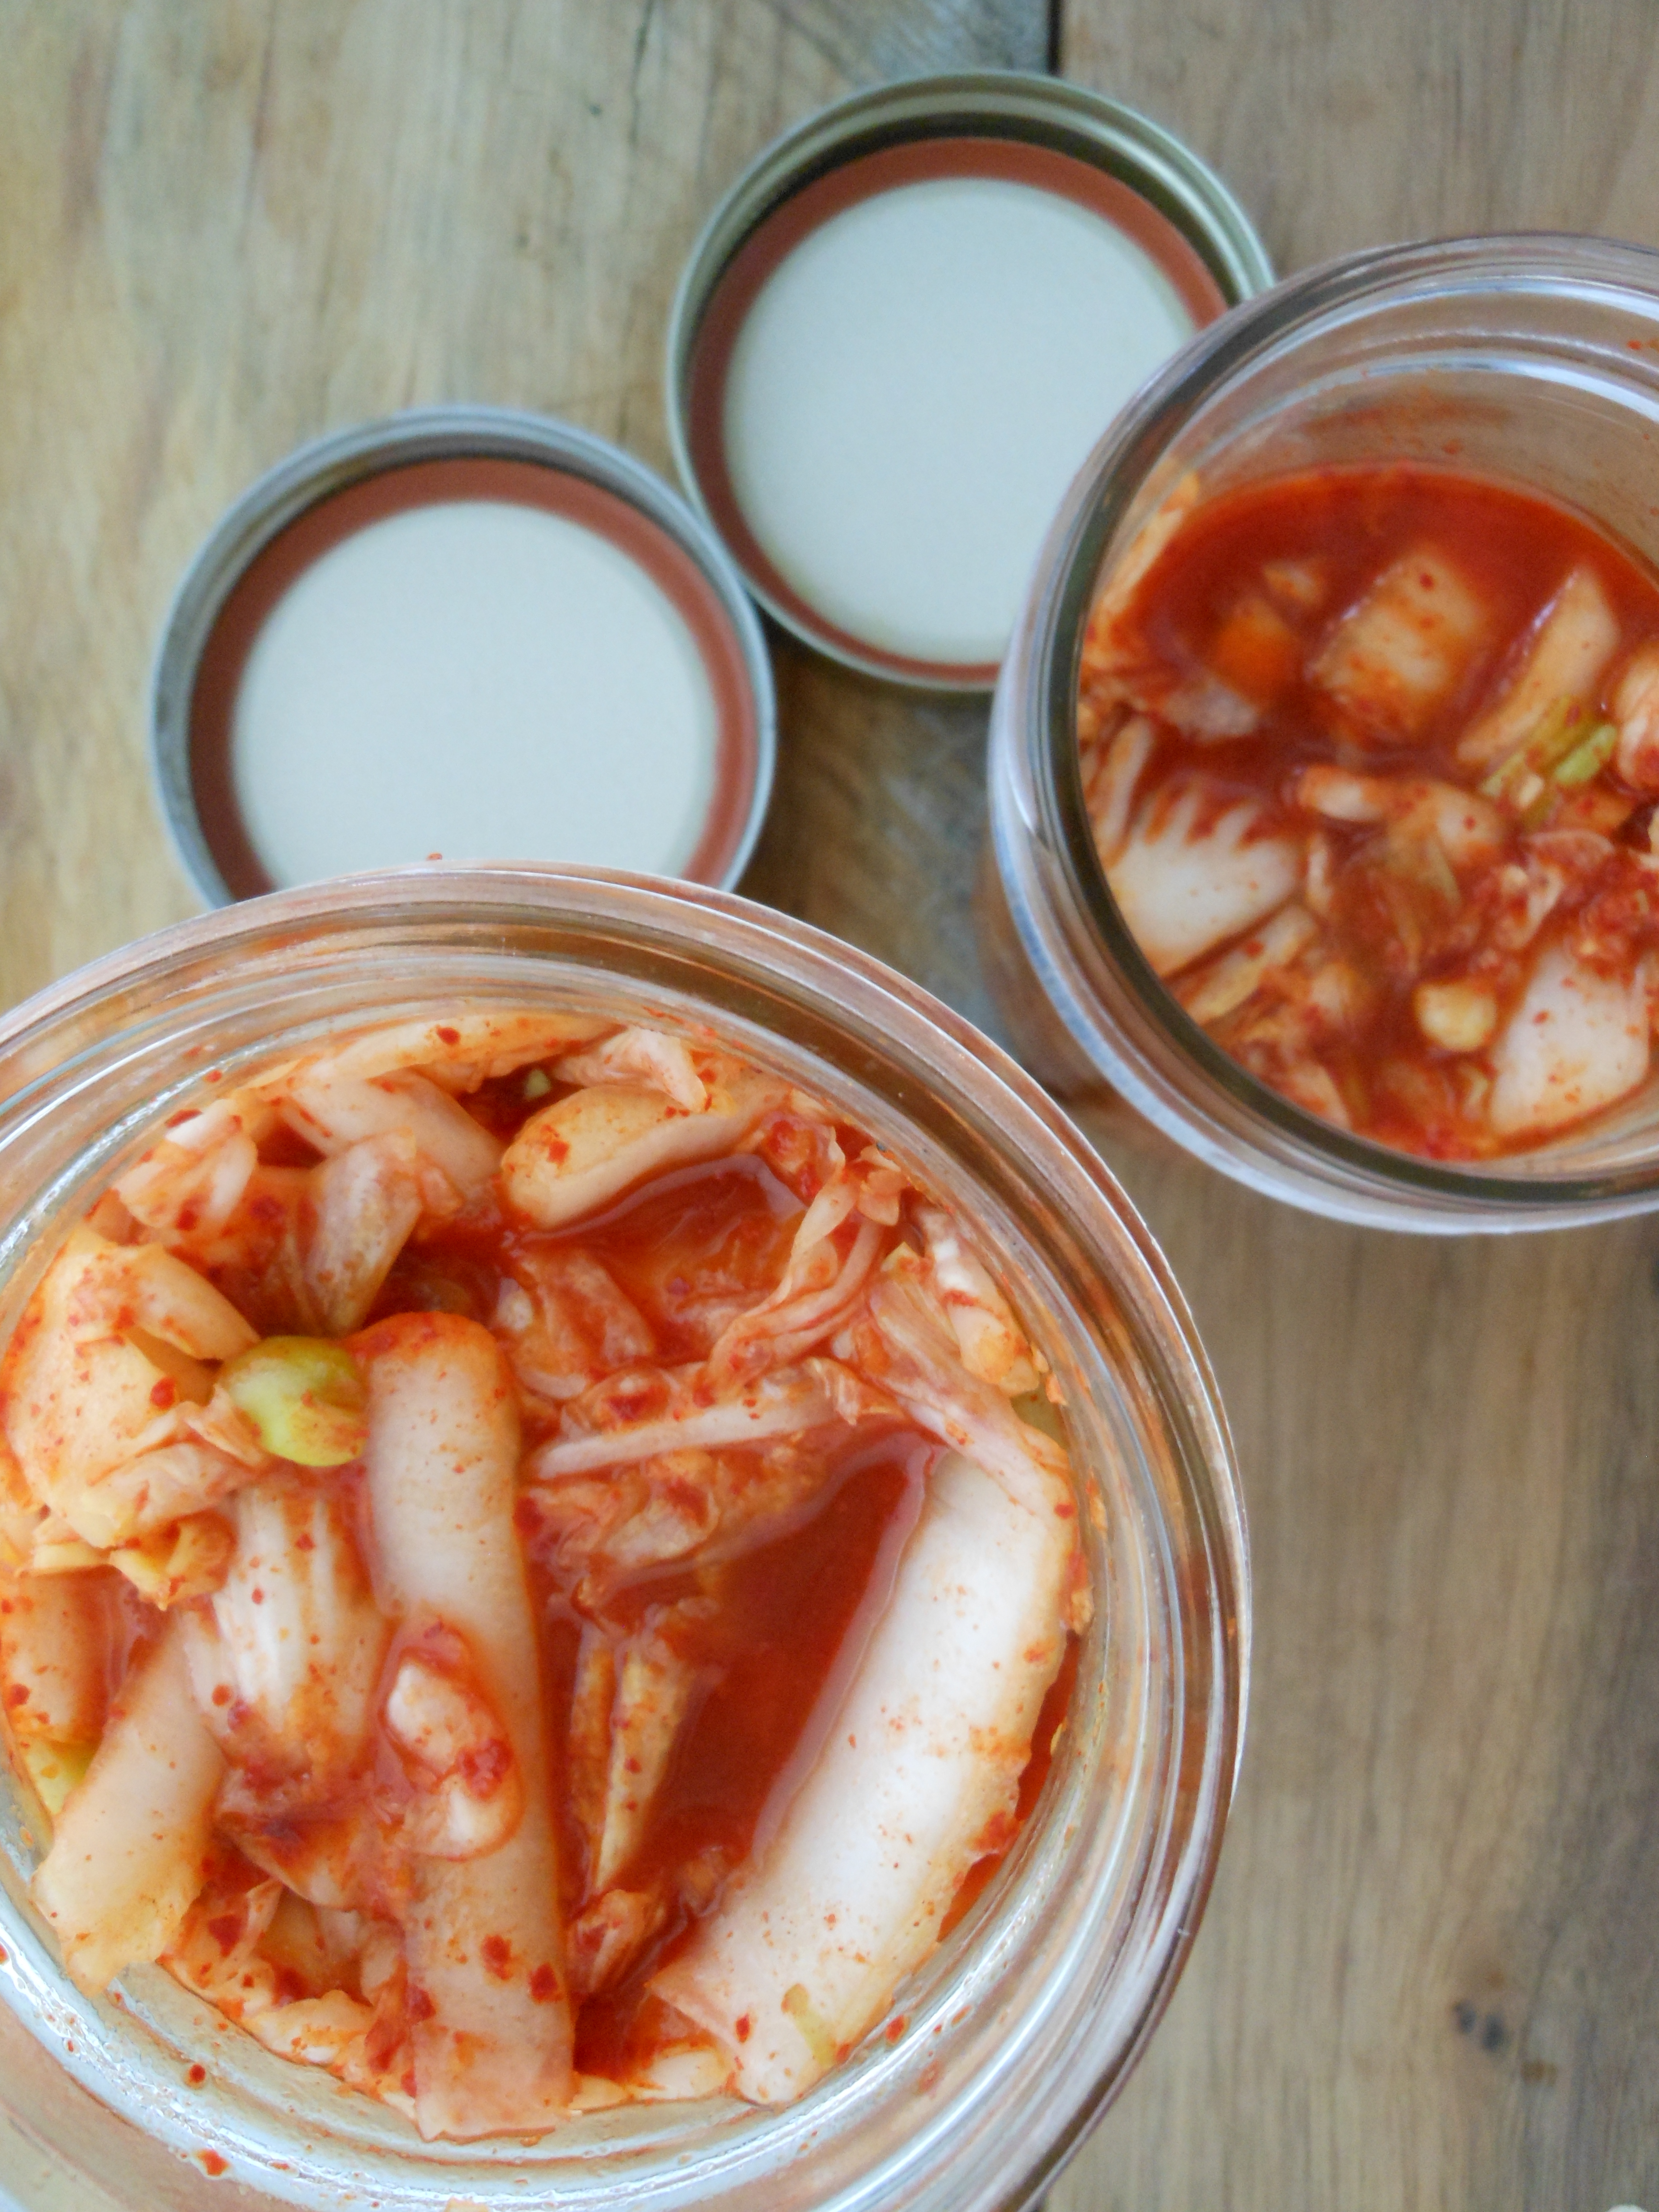
White Girl Kimchi made 1 quart & 1 pint

2-2 1/2 lb head of cabbage, I used Napa cabbage

1 bunch scallions, ends trimmed, cut into 3/4 inch pieces

1 T. chopped garlic

1 T. grated ginger

3 T. korean chili

3 T. korean fish sauce

1 T. plus 2 tsp. local honey

coarse sea salt

DSCN3785Directions:

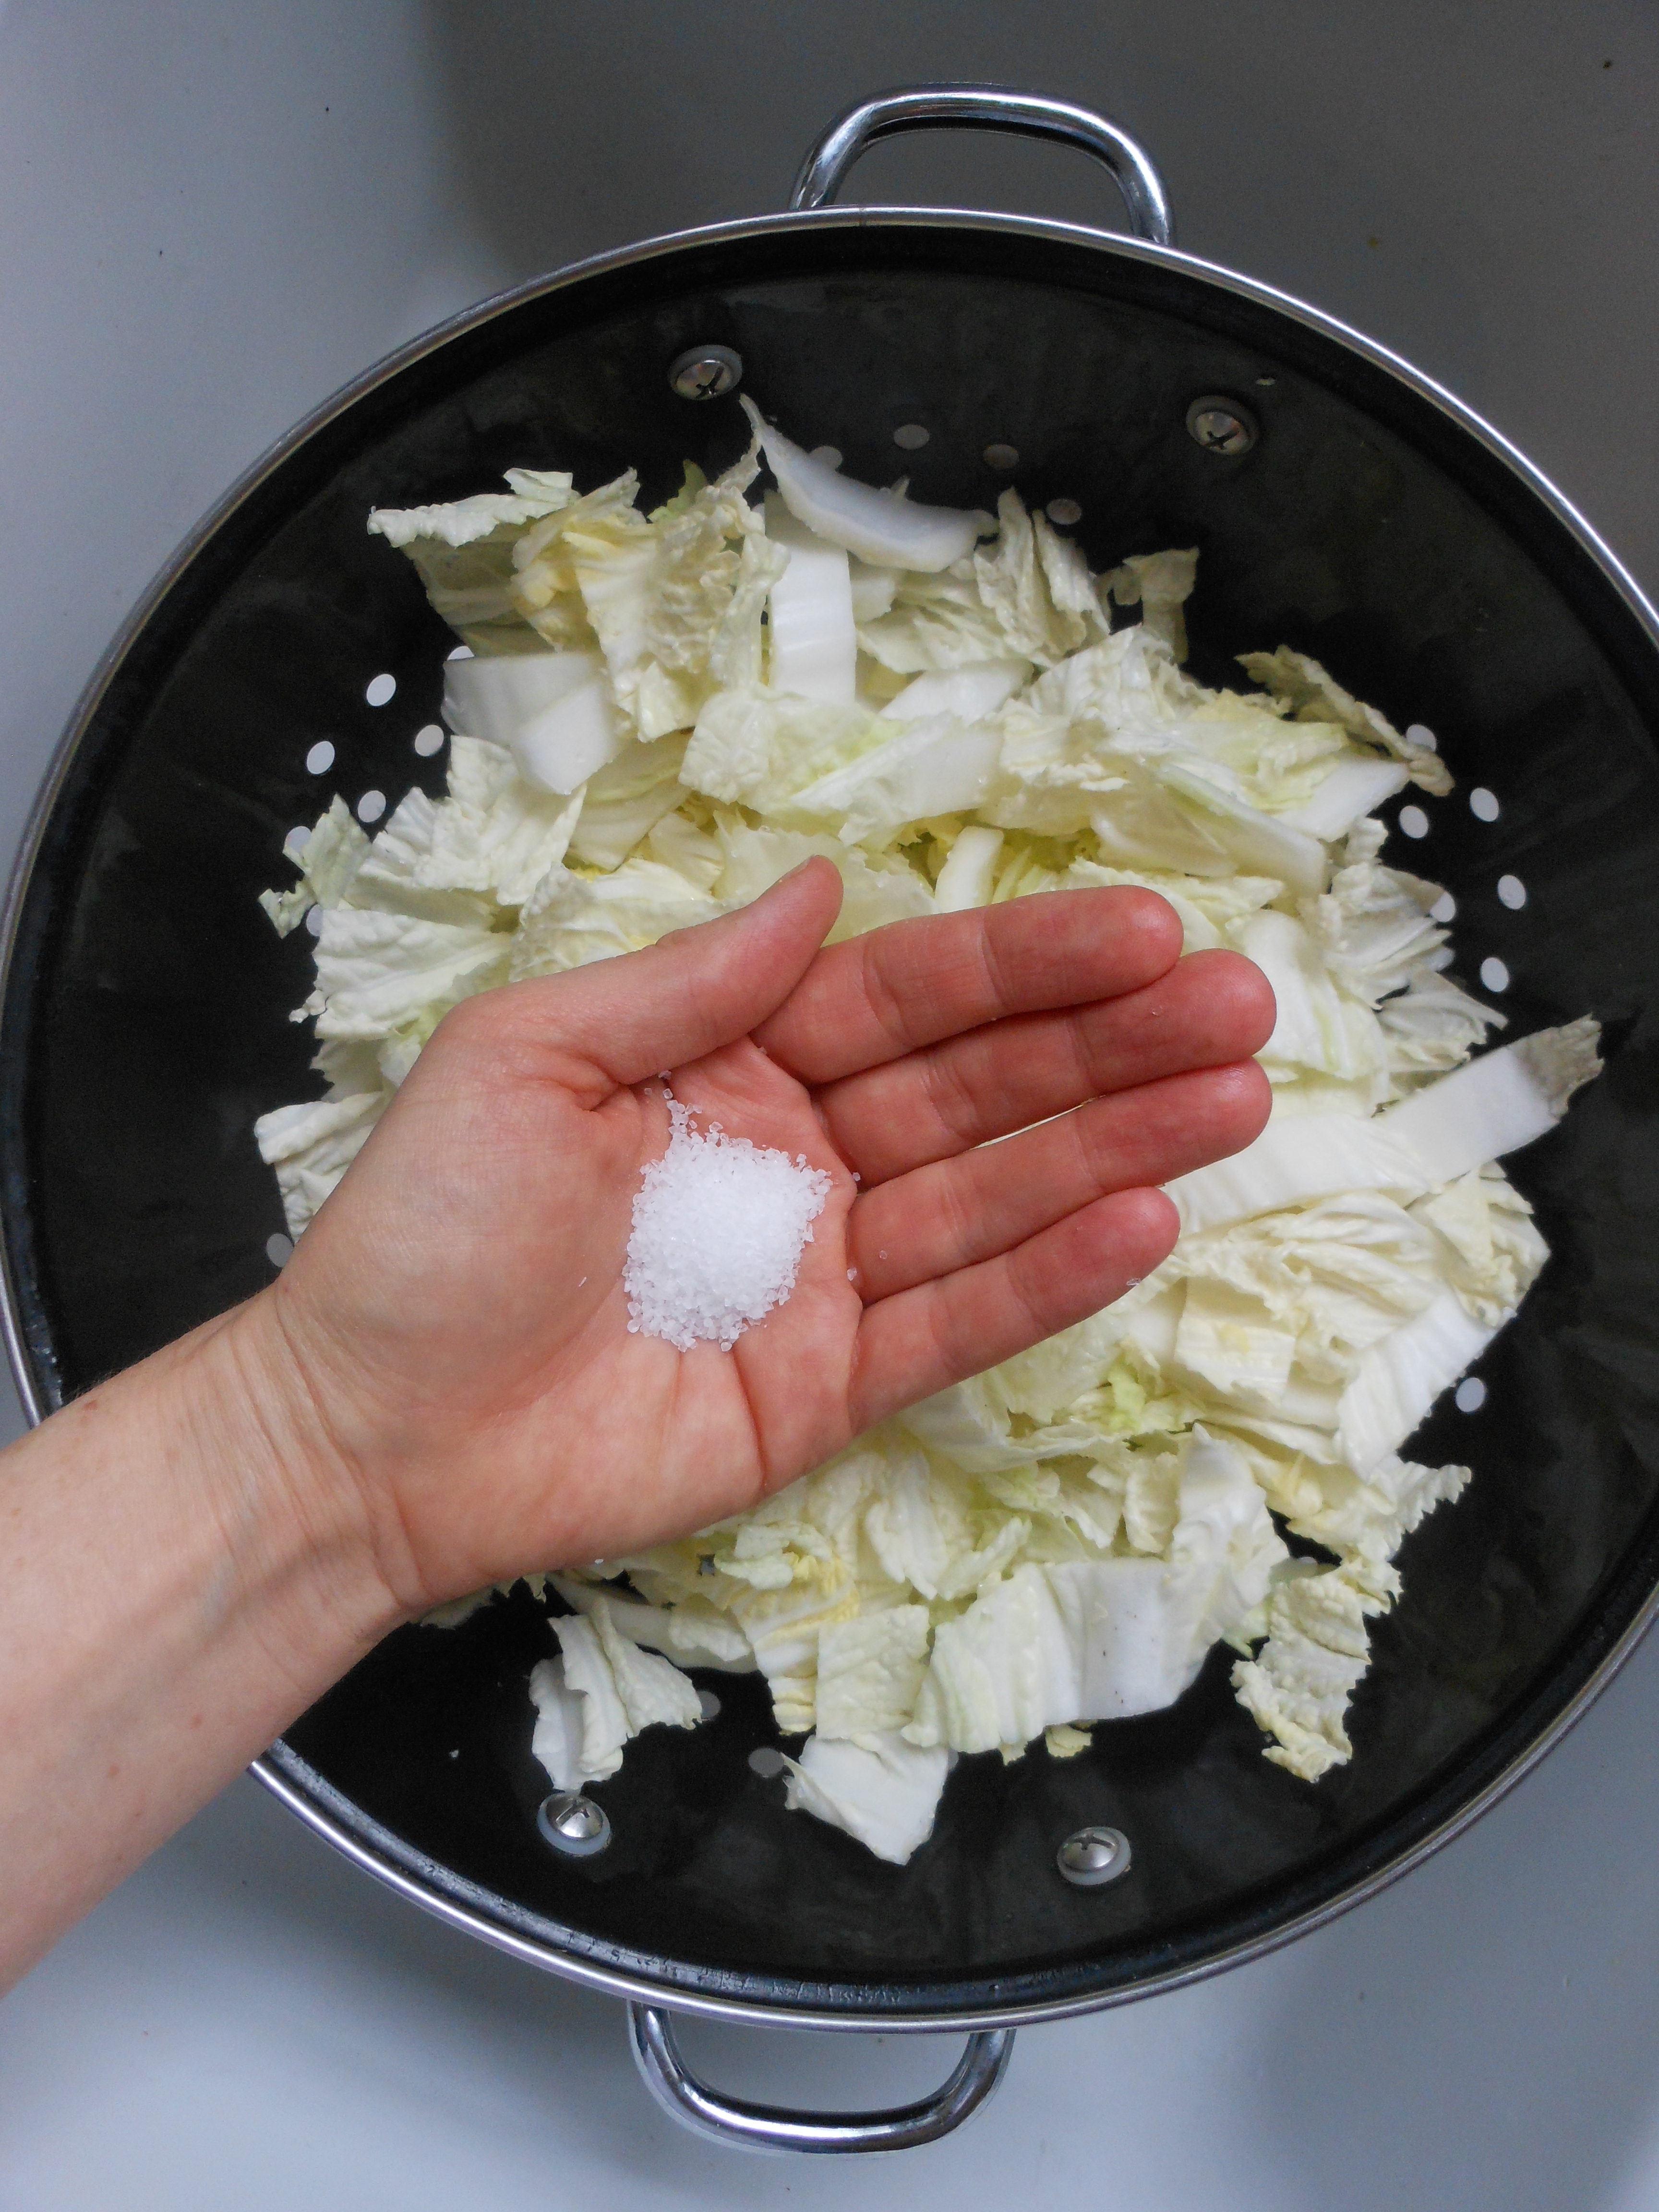
1. Start by placing two colanders in your sink. Next cut the cabbage in half, cut out the core and then cut the cabbage into 1 inch chunks. Divide the cabbage between the two colanders.

2. Sprinkle 1 T. of coarse sea salt over each colander filled with cabbage. Toss the cabbage with your hands to disperse the salt. Let the cabbage sit for thirty minutes.

DSCN3786
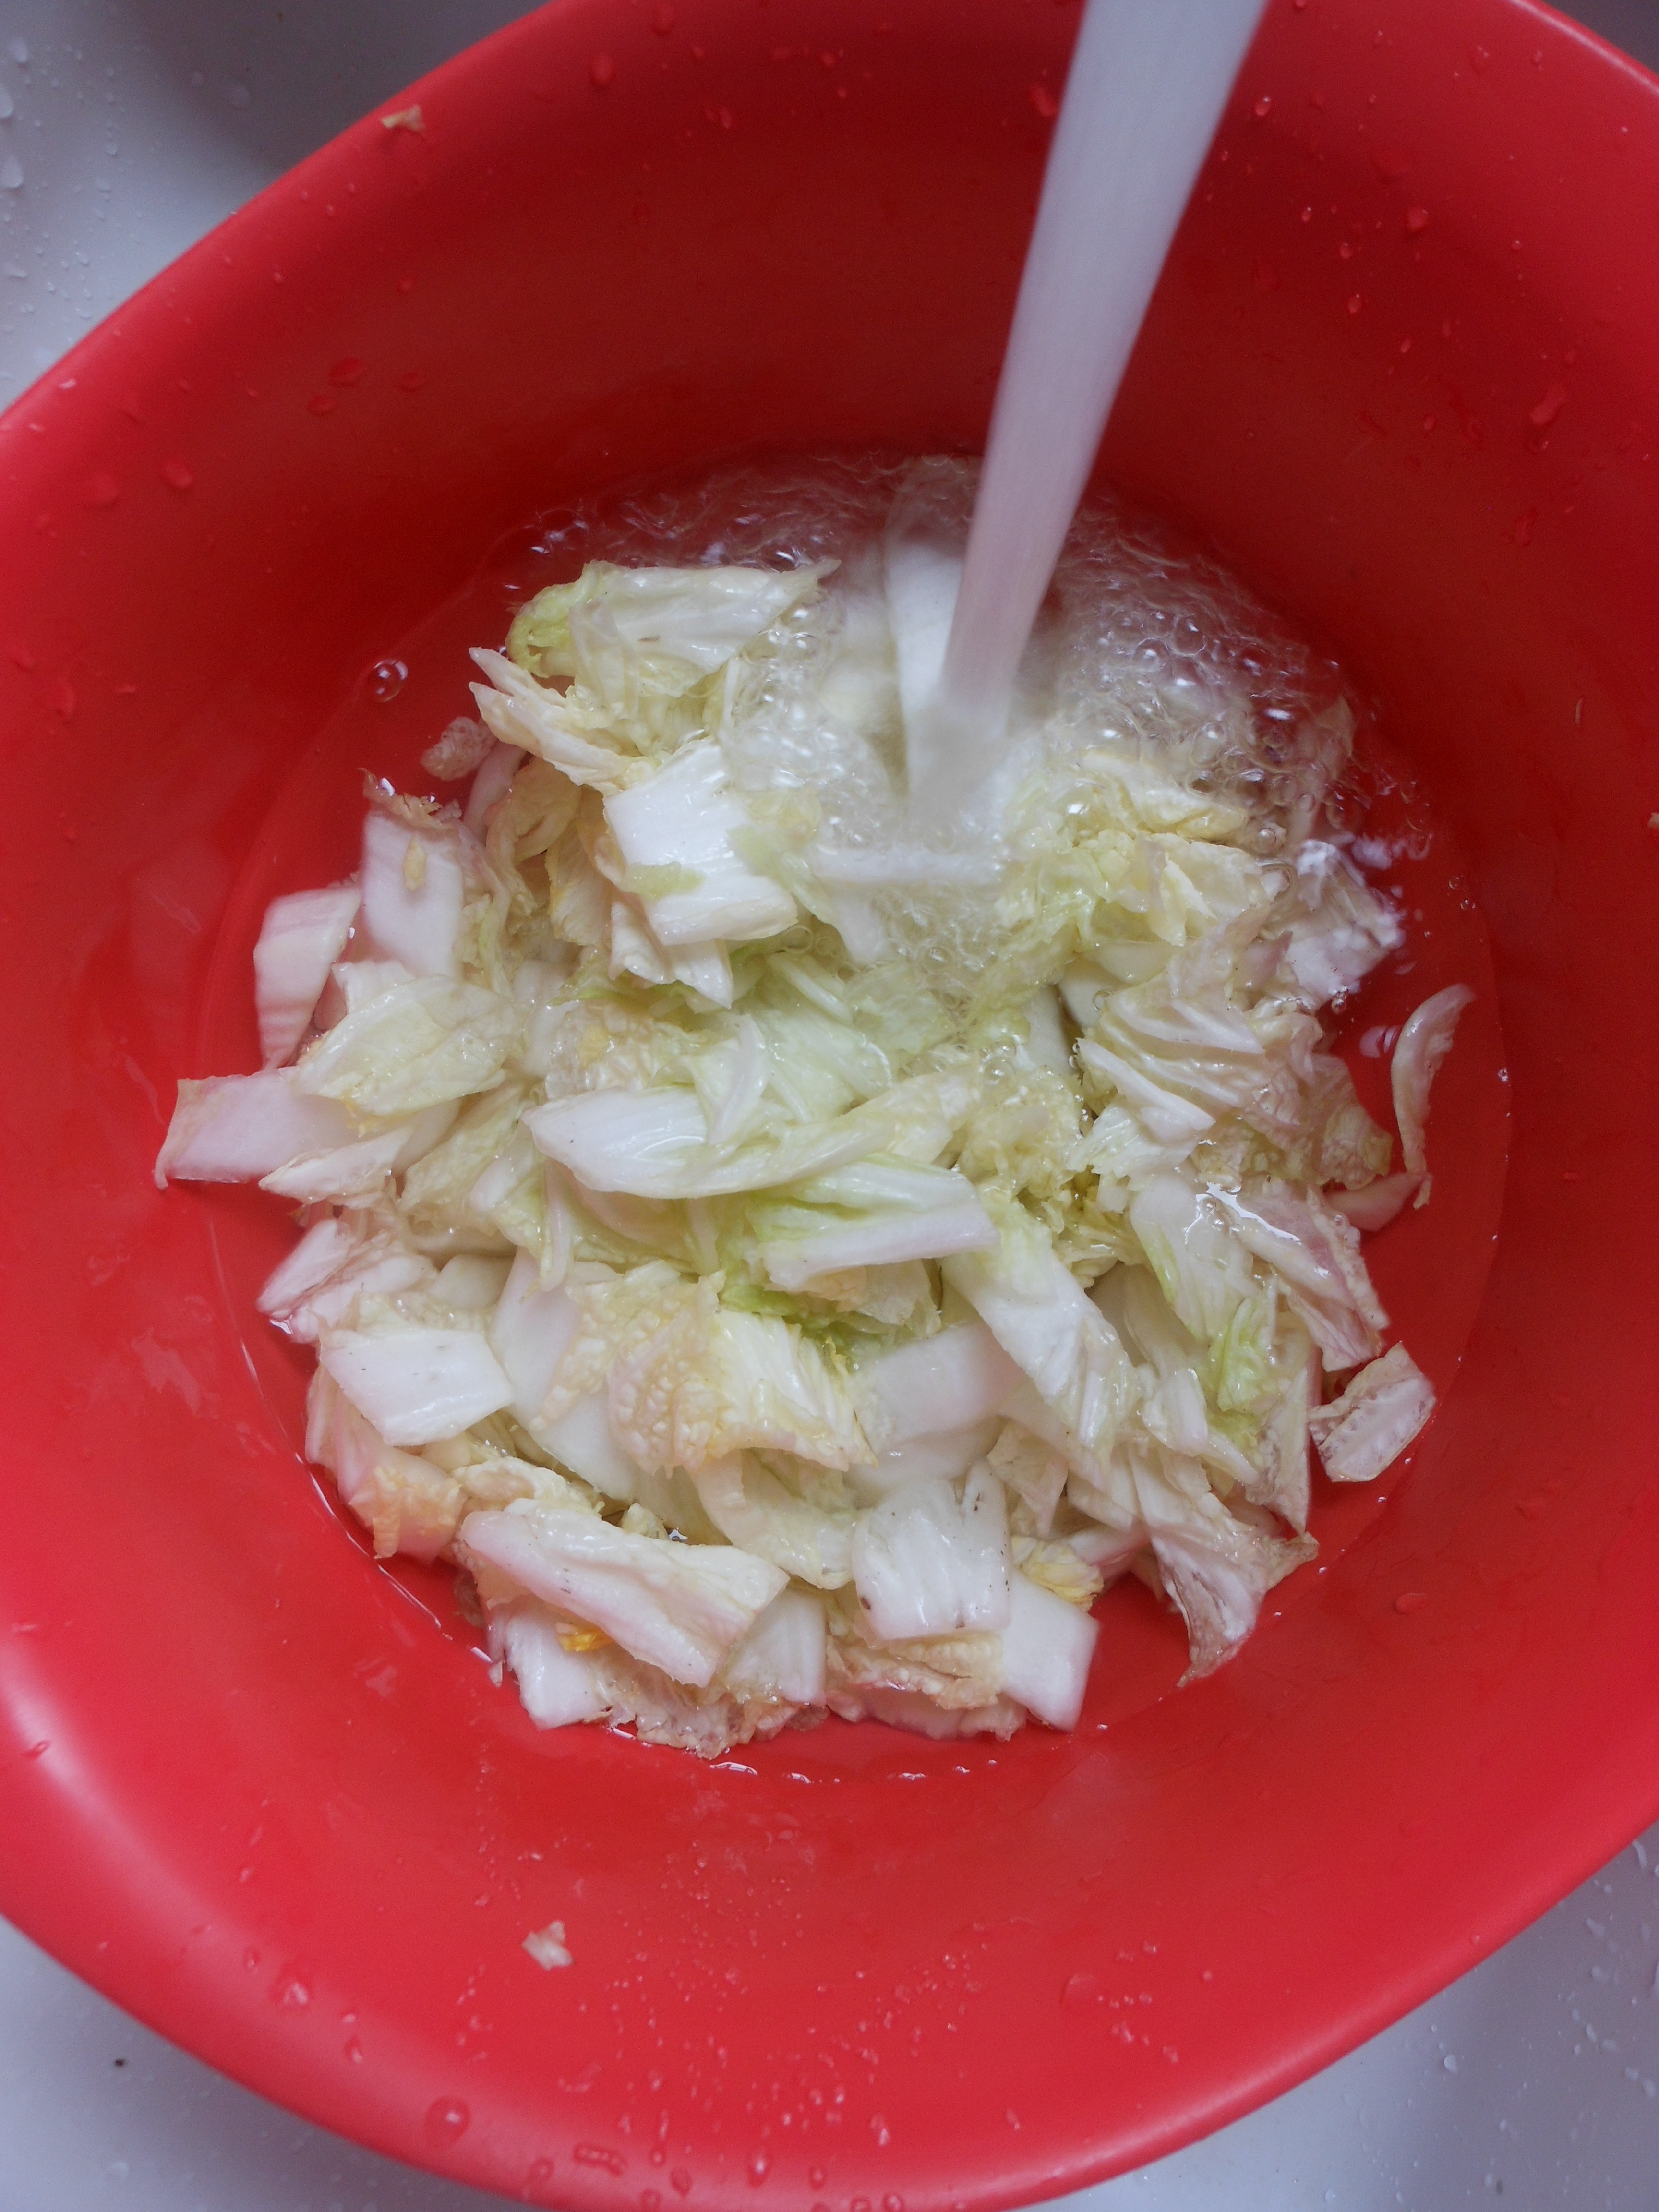
3. The cabbage should be wilted and reduced in volume. Place the cabbage in a bowl and fill with cold water, swish the cabbage around in the cold water. Drain and rinse two more times (taste it, it should taste seasoned but not overly salty) . Drain well and set aside.

DSCN3795
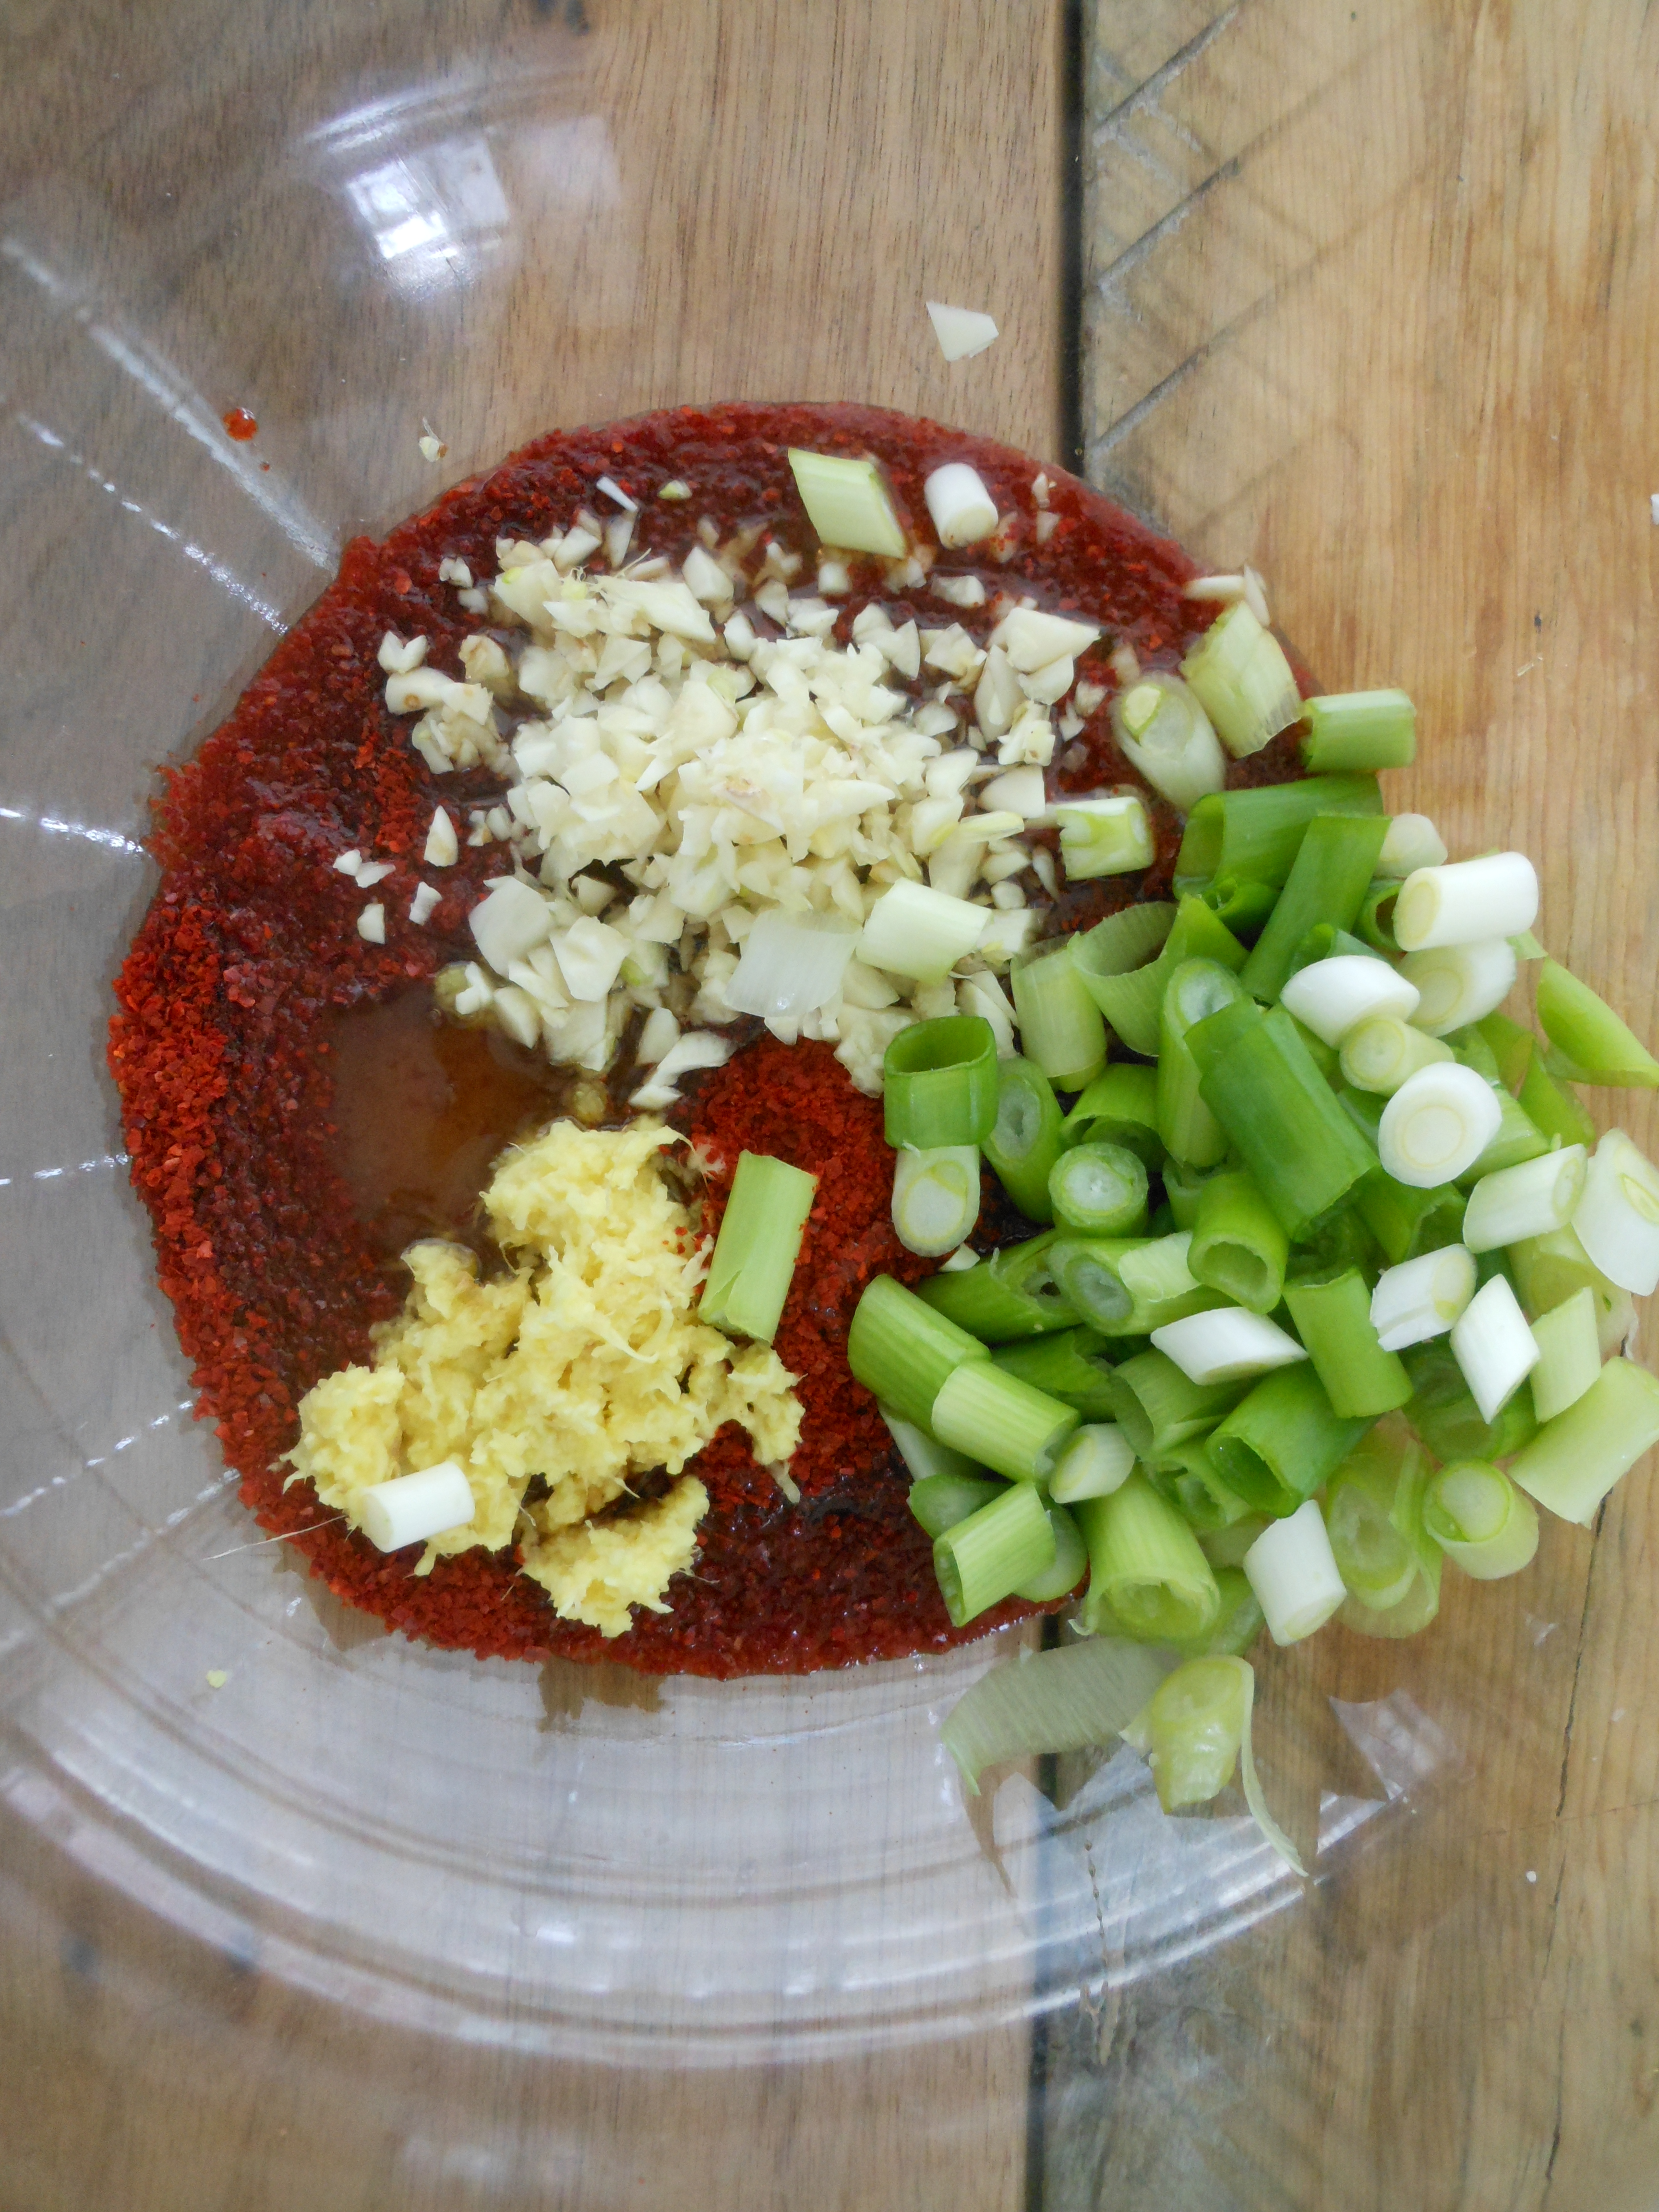
4. In a large bowl mix together the garlic, ginger, scallions, korean chili, korean fish sauce and the honey.

DSCN3788DSCN3792DSCN3793
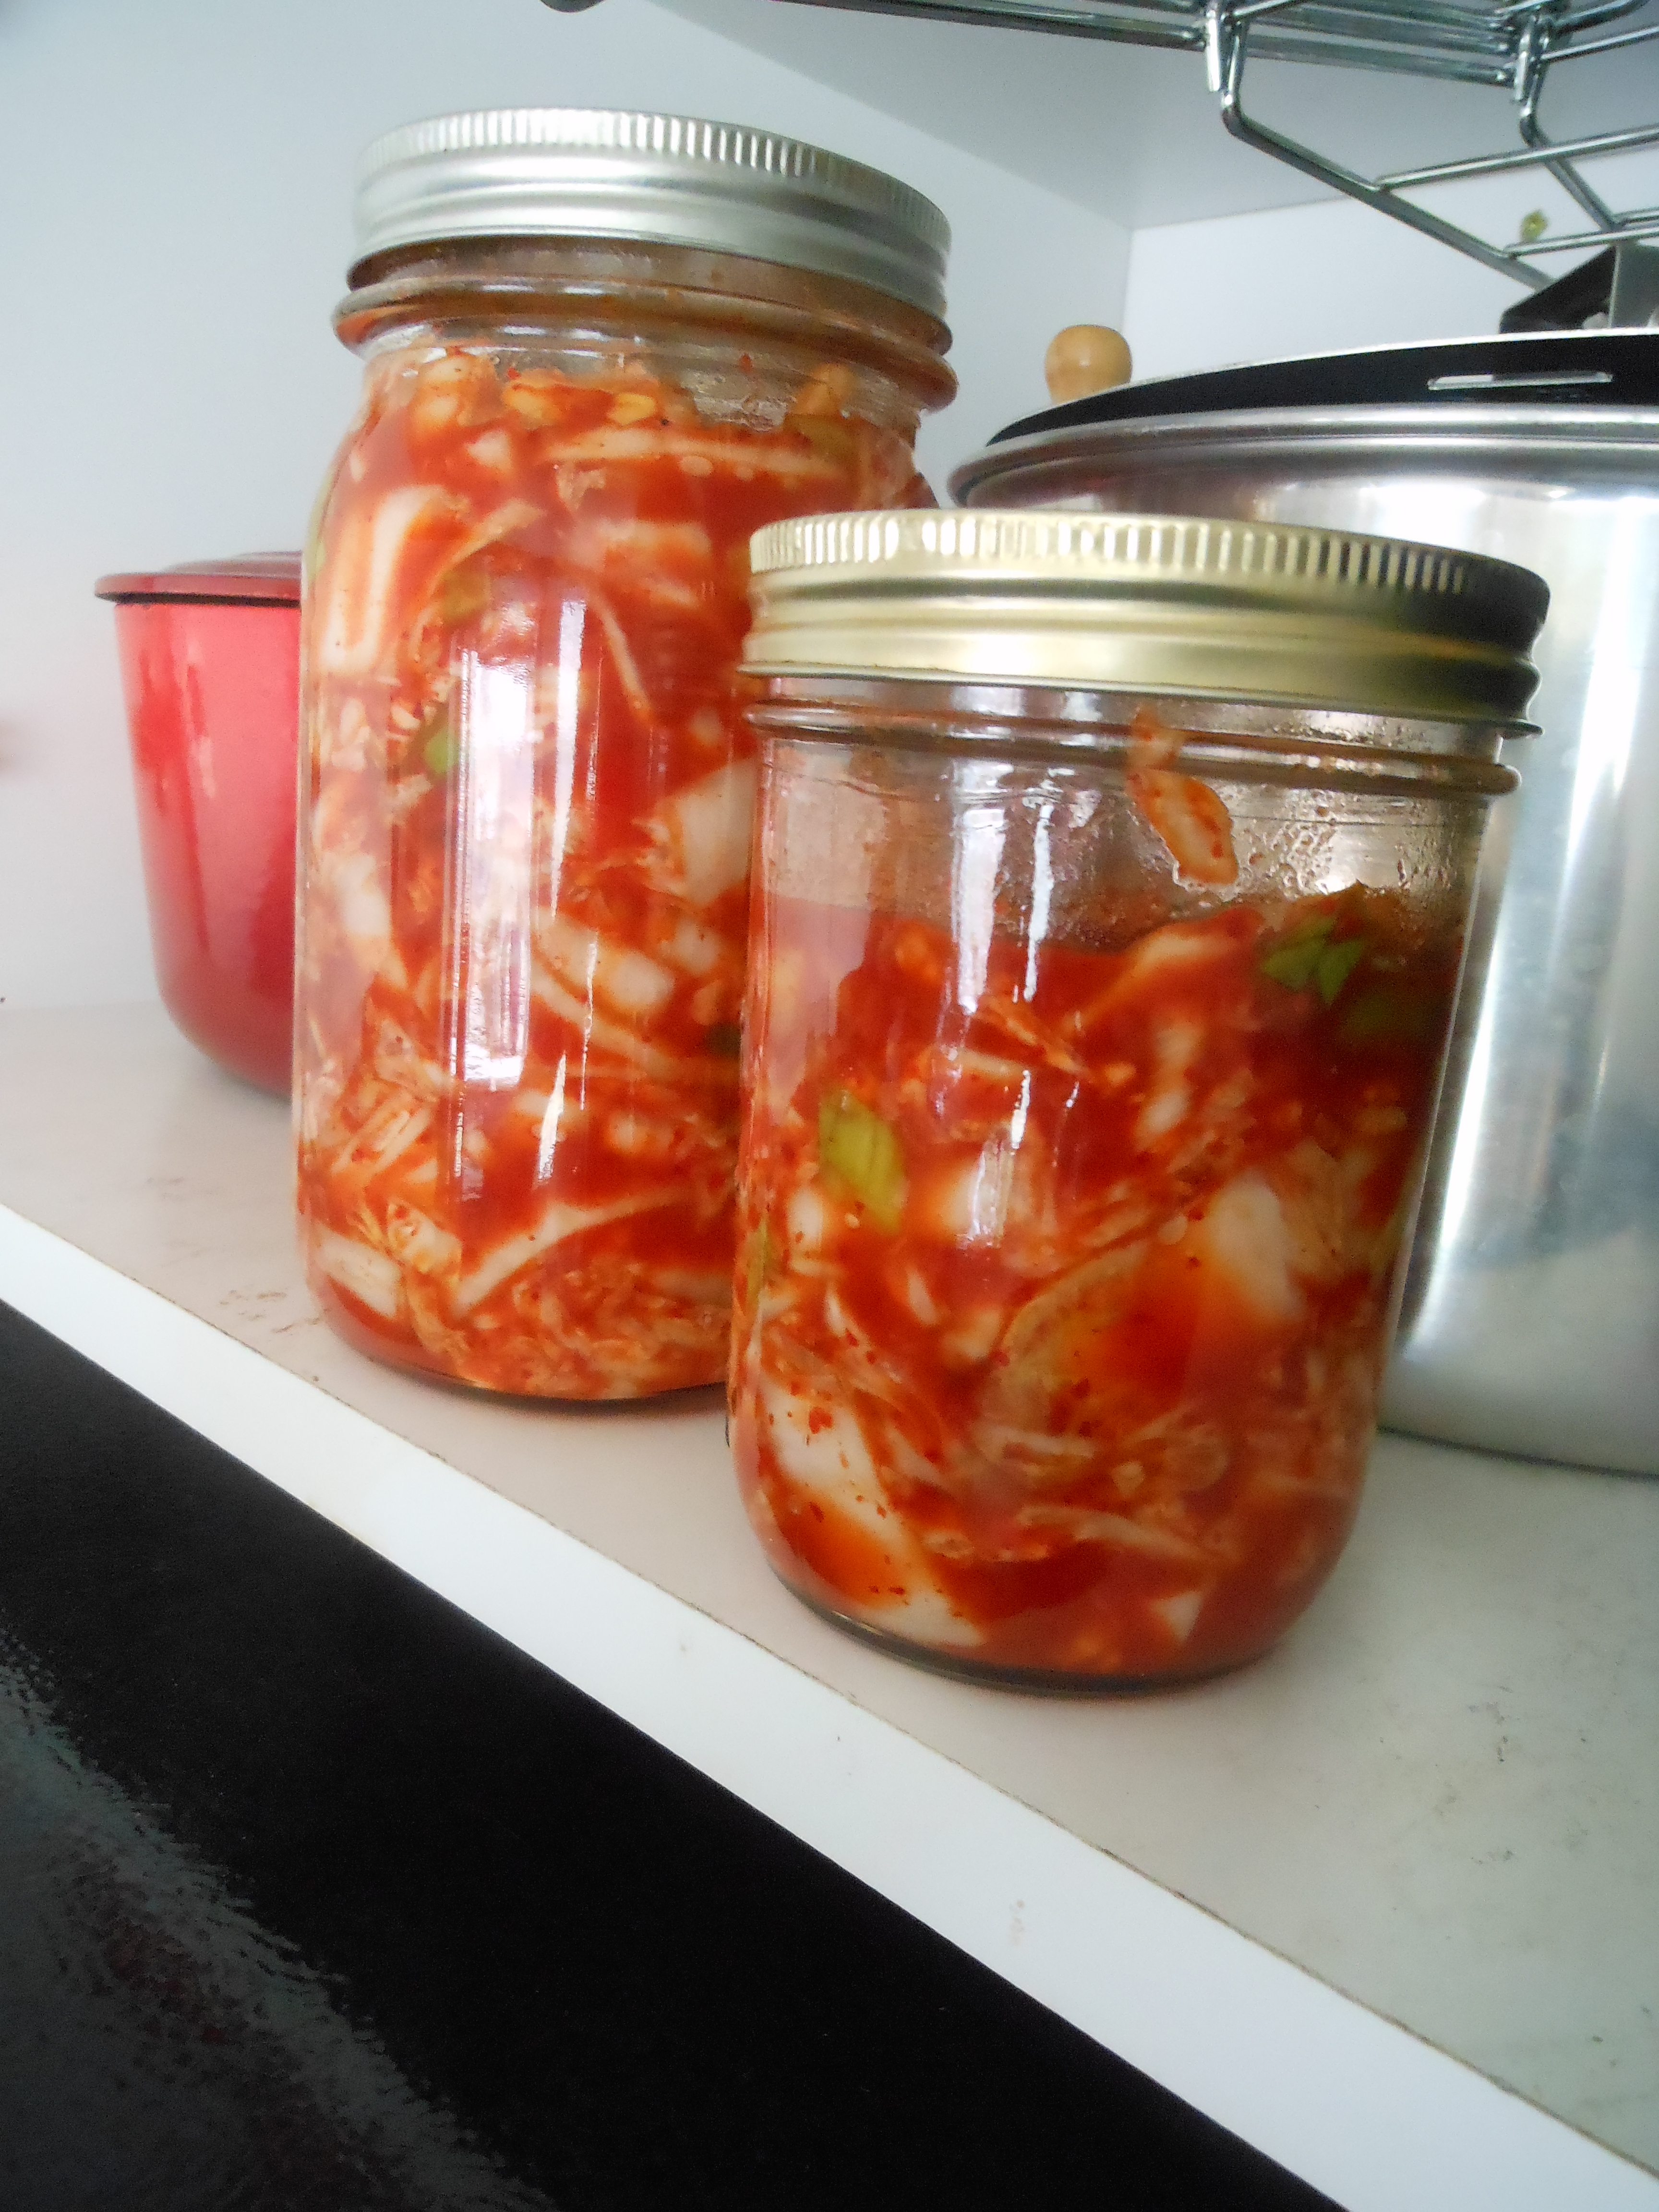
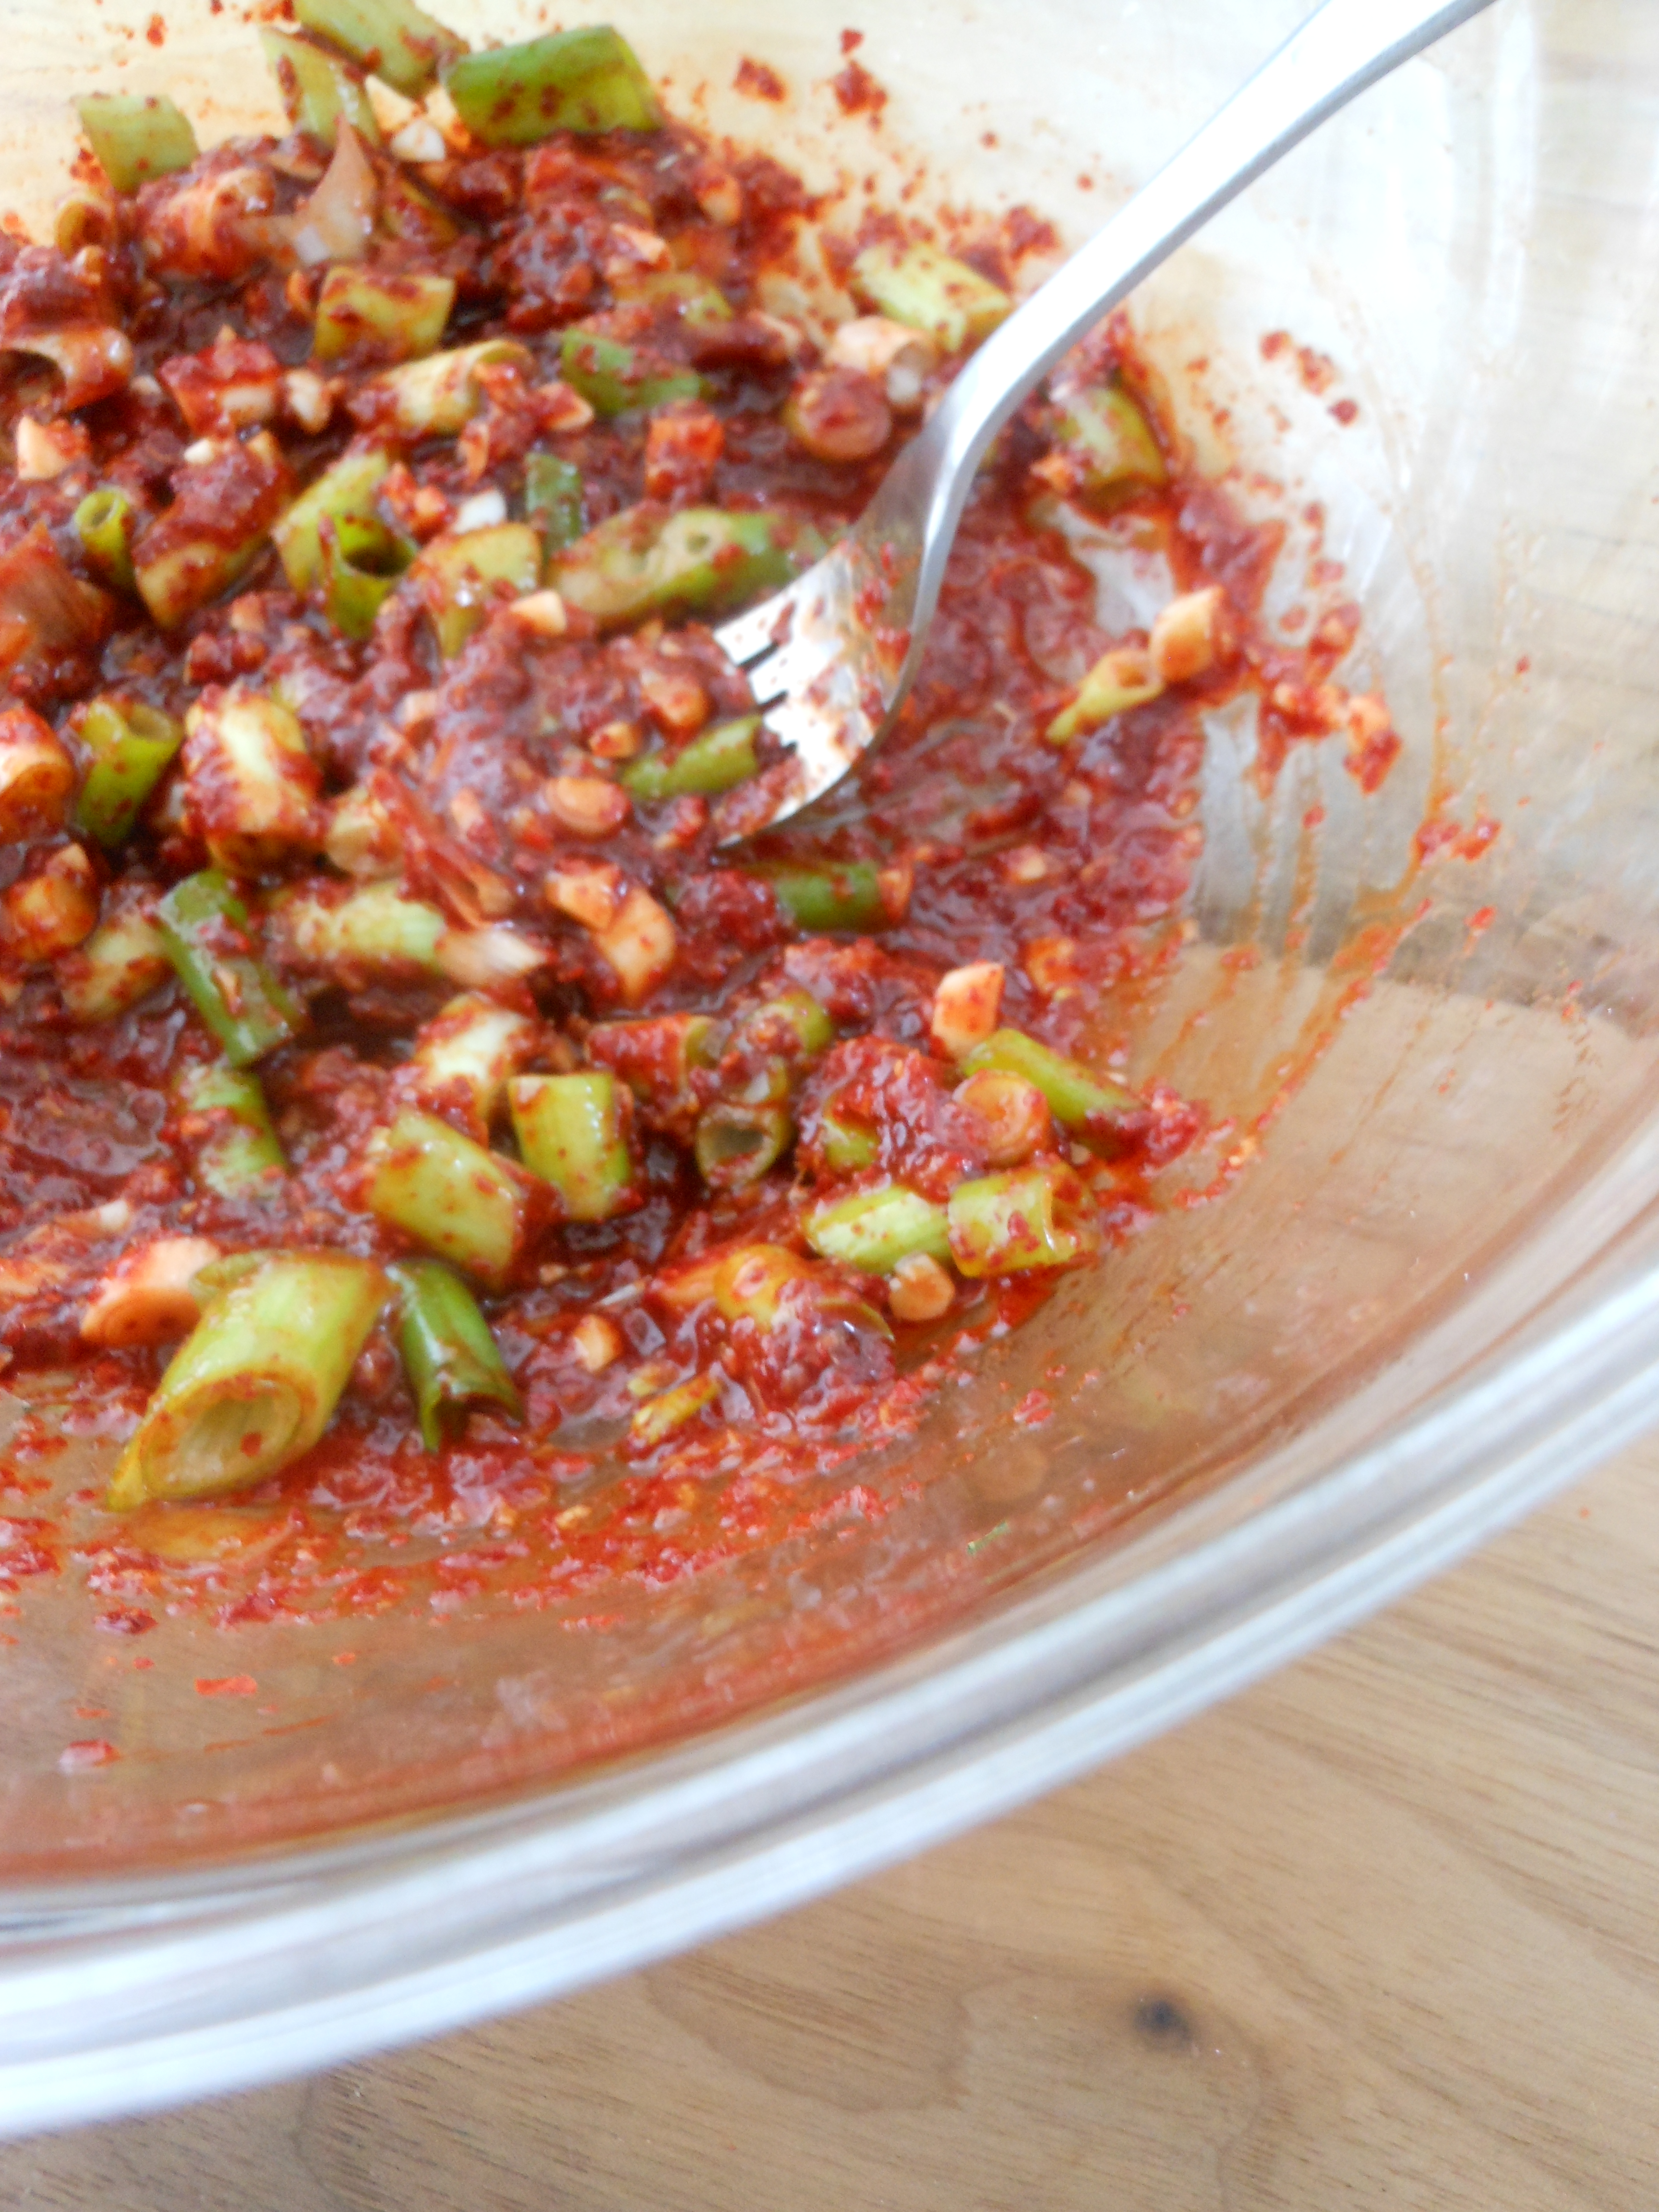
5. GENTLY squeeze the cabbage to drain, just a little! Add the drained seasoned cabbage to the ginger/chili bowl and toss well to coat all of the cabbage (taste it and adjust seasoning). Pack the cabbage into glass mason jars being sure to leave a little head room, place a tight-fitting lid on the jar. Place the jars in a cool dark place, I place mine in the cabinet above my fridge. Let the kimchi sit for about three days and then place it in the fridge. I like to unscrew the lids and push the kimchi down and release some kimchi gases before storing in the fridge.

DSCN3797DSCN3807Love:

This is how I knew my kimchi was ready to go in the fridge- my husband came up from downstairs and said “what stinks?!” I said “kimchi is ready!” I have loved kimchi ever since I was a kid, I often wonder what my parents thought about their child asking for kimchi at the grocery store. My parents where both great cooks but we certainly didn’t eat kimchi at our dinner table. I have bought many different kinds of kimchi searching for the one that most reminded me of being a kid, failing to find the one. I have also attempted many times to make it myself, failed again! It wasn’t until I begged my friend Vanessa Chang to “please” come over and show me the mastery of this ancient food that I got a first hand look at how this special Korean condiment is made. The first time we made it she demonstrated and I watched, the second time I demonstrated and she watched, the third time I went solo and VIOLA, White Girl Kimchi was achieved! I lovely call it that because I am no way a master of kimchi, I’m still learning but I am so proud of myself for learning how to make something new that I have loved all my life. The salty, spicy, acidity that this kimchi has is just what I’ve been looking, and now a forever staple in the Cosmo Hippie Chef kitchen, even if my husband thinks it stinks! (Remember that’s how you know you did it right!) Enjoy!

Nutrition:

Probiotic- Bacteria, bacteria, bacteria! Kimchi is fermented therefore FULL of probiotics, aka good gut bacteria. Kimchi is full of vitamin A and C which are great for the immune system, 70% of our immune system happens in the gut. Our guts are so advanced it should actually have its own brain! With all the processed foods, stress and environmental toxins we are exposed to on a daily basis it is important to maintain healthy gut flora. Foods like kimchi can help, miso, sauerkraut and kombucha are also great probiotic foods.

DSCN3805


Egg Pots- Survival Food

12 Wednesday Mar 2014

Posted by cosmohippiechef in breakfast, dinner, gluten-free, lunch, Side dish

≈ 2 Comments

Tags

asparagus, eggs, gluten free, onions, vegetables

DSCN3730Love:

Well it is safe to say that February kicked my behind! Nothing more than the ordinary person, but it didn’t leave me much time for anything but work and my family. In order for me to take care of what needed the most attention my blogging had to take a backseat, I know you all understand and I bet you’ve even been there yourself. BUT, I am happy to report that during this hectic time I was able to make sure we ate well and I am excited to share the recipe I made the most during this stressful time.

These little egg pots can be eaten anytime of day and can be made with whatever veggies you have on hand, they are best enjoyed warm but can be made ahead and reheated. Since I don’t eat much meat, eggs are a great protein source for me. I buy local eggs at the farmers market and enjoy them hard-boiled, poached, scrambled and like this in these egg pots. My husband likes his egg pots with a side of sourdough toast slathered with ghee, I like mine with a side of avocado toast. It is nice to have a few recipes that can keep you nourished on the inside when everything on the outside is going haywire. This is an everyday recipe that is quick and healthy. ENJOY!

Food:

Egg Pots- Survival Food serves 2

Note: This isn’t an exact recipe other than the eggs, just use your instincts and if you make too much filling save it and serve it over brown rice with a poached egg or a quesadilla for your little stinkers.

DSCN37114 local eggs

8-10 stalks of asparagus, trimmed and chopped (you could sub with broccoli)

1 c. Brussels sprouts, chopped (you could sub kale)

8-10 medium shiitake mushrooms, chopped

1/2 small onion, chopped

1 tsp. Toum (you can use fresh chopped garlic)

ghee

salt and pepper

Directions:

1. Pre heat oven to 375 degrees. Place a small amount of ghee in 4 ramekins and distribute it evenly, place the oiled ramekins into a medium casserole dish that will be able to hold water.

2. Melt about 2 tsp. of ghee in a medium saute pan, add the onion, asparagus, Brussels sprouts and mushrooms, season with salt and pepper. Saute until the asparagus is bright green, add the Toum or garlic until the scent of garlic fills the kitchen. No need to over cook the veggies since they’ll be going into oven.

3. Place two heaping spoonfuls of the veggies in each ramekin, next crack an egg crack over each ramekin. Season each egg with a little bit of salt and pepper.

DSCN3715DSCN37194. Heat a teapot/kettle until hot, pour hot water into the casserole dish until the water is 3/4 up the sides of the ramekins. Carefully place the casserole dish with the water and ramekins into the oven and bake 20-25 minutes.

DSCN37225. Let the pots cool just a bit and then remove them from the hot water, serve with buttered or avocado toast, EAT!

Nutrition:

Asparagus- Asparagus is an excellent source of potassium, vitamin K, folic acid, vitamins A&C. It is also a very good source of dietary fiber, niacin, phosphorus, protein and iron!

Shiitakes- These little nutrient dense morsels have long been a symbol of longevity in Asia because of its health-promoting properties. Shiitakes contain an active compound called lentinan. Lentinan has the power to boost the immune system  and strengthen its ability to fight infection and disease. It has also been shown to have anti-cancer activity.

Eggs- Choosing local, organic free range eggs means you are ensuring that what you are consuming is free of harmful antibiotic-resistant bacteria. Free range chickens feed on seeds and insect and sometimes flax seeds or special meal enriched with DHA which increases the omega-3 content of their eggs.

DSCN3727

Broccoli Chop Salad- Take Two

16 Thursday Jan 2014

Posted by cosmohippiechef in appetizer, gluten-free, salad, Snack

≈ 1 Comment

Tags

broccoli, cilantro, gluten free, onions, peas, salad, vegetables

DSCN3663Food:

Broccoli Chop Salad serves 8

1lb broccoli florets

1lb romanesco, chopped

16oz bag of shelled edamame/ or peas

2 c. celery, chopped

2 green apples, chopped (farmers market)

1 c. tart dried cherries (farmers market)

1/4 large purple onion, chopped (farmers market)

1 c. cilantro/parsley/mint (you decide) leaves, lightly packed

1 c. sunflower seeds, shelled

Dressing:

1 c. goat yogurt (farmers market, you could sub with veganaise or your favorite yogurt)

1/4 c. rice vinegar

1-2 T. pure maple syrup

salt and pepper

*optional- Stilton Blue Cheese (this is a great addition if you are making this salad for a party or get together, no one minds eating all these veggies when cheese is involved!)

DSCN3649Directions:

1. Start by bringing a large pot of salted water to a boil, also place a large bowl of water and ice in the sink to blanch the veggies. When the water comes to a boil drop the broccoli and romanesco into the water for about two minutes or just until their color brightens. Ladle the veggies out of the boiling water and plunge them into the cold ice bath. Drain veggies, set them aside and prepare another ice bath for the edamame, cook edamame according to the directions on the package. Then plunge them into an ice bath. Drain and set aside.

DSCN3652DSCN3654DSCN36552. In a large bowl mix the dressing ingredients, taste and season with salt and pepper. Add in the onions, apples, cherries and celery. Then add the blanched broccoli, romanesco and edamame, toss to coat. Lightly fold in the cilantro.

3. Toast the sunflowers seed in a dry saute pan until fragrant and slightly toasted. Toss them over the salad. EAT!

Nutrition:

Broccoli/romanesco- Broccoli is one of the most nutrient dense foods and is super low in calories! It is especially rich in vitamin C and 1 cup has about the same amount of protein as a cup of corn or rice but less than on third amount of calories. Broccoli is also a good source of vitamins K, C and A, as well as folic acid and fiber. It also contains phytochemicals with tremendous anticancer effects.

Apples- Apples are very high in pectin, a soluble fiber that has been shown to exert many beneficial effects. Because of its gel-forming fiber, pectin can lower cholesterol levels as well as improve the intestinal muscle’s ability to push waste through the gastrointestinal tract. Basically apples will help you poop like a rockstar!

Sunflower seeds- Studies have shown that the American diet is deficient of vital nutrients such as selenium which can be found in sunflower seeds. This particular mineral has anti-cancer, anti-inflammatory and antialler-genic properties. Sunflower seeds are also a wonderful source of protein, vitamin E, magnesium, vitamins B1,5 and 6, phosphorus, copper, iron, folic acid and fiber.

(Above nutrition tid bits came from The Encyclopedia of Healing Foods)

Love:

This recipe is an oldie but a goodie, I posted the original version almost 4 years ago! I can’t speak for all bloggers but sometimes it’s good to go back and revisit some of your old recipes and update them. I start to crave this recipe during this time of year because I am looking for a little crunch in my diet. After indulging in all the wonder slow cooked foods from the holidays this girl needs some fresh flavors and I just love the color and textures of this salad! I also love it with a little good quality blue cheese such as Stilton, but if you are trying to clean up your diet after the holidays just leave it out. If you want another fresh crunchy seasonal salad check this one out from last year. I hope these recipe finds you happy and healthy in this new year. ENJOY!

DSCN3656

Baked Ratatouille

30 Friday Aug 2013

Posted by cosmohippiechef in breakfast, gluten-free, seasonal, Side dish, vegan

≈ Leave a comment

Tags

chilies, eggplant, garlic, gluten free, local, onions, parsley, potatoes, seasonal, tomatoes, vegan, vegetables, zucchini

DSCN3182

Food:

Baked Ratatouille serves 8-10

2-3 zucchini, cut into 1/2 inch chunks (gifted)

4-6 baby red potatoes, cut in quarters (Farmers Market)

6-8 baby japanese eggplant, cut into 1/2 inch chunks (gifted)

a head of garlic, chopped, if cloves are big use about 4-6 (gifted)

4-6 shallots, chopped (gifted)

a couple of chilies, your choice, chopped (I used three Thai chilies from the Farmers Market, chilies are optional)

a medium size container of your favorite cherry tomatoes, cut in half (Kenyon Organics)

2 T. olive oil

2 T. ghee, you can use regular butter or coconut oil

salt and pepper

a couple of sprigs of fresh thyme (my garden)

a couple of sprigs of fresh rosemary (my garden)

parsley, chopped (my garden)

Parmesan cheese, optional (Caputo’s Market)

DSCN3176

Directions:

1. Pre heat the oven to 400 degrees.

2. Place all the chopped veggies in a your favorite baking dish. I used my big yellow one that is really deep, when I made my Gluten-free Strawberry Rhubarb Cobbler it held 15 cups of fruit! So used a big baking dish.

3. Toss the veggies and season with salt and pepper. Next drizzle the olive oil over the veggies and toss again. Lastly, dollop the ghee on top of the veggies and place the thyme and rosemary on top as well.

4. Cover with foil and bake for 45 min. After that 45 minutes remove the foil toss the veggies around and bake for another 45 minutes. I know it is done when the juice from the veggies is almost covering the veggie mixture.

5. Remove from oven and let it cool just a bit and top with chopped fresh parsley and fresh grated Parmesan cheese. EAT!

DSCN3177DSCN3183

This is how we enjoyed our Baked Ratatouille…

DSCN3187The day I made the Baked Ratatouille we had it for dinner with Wild King Salmon, super delish.

DSCN3190 The next morning we had the baked Ratatouille for breakfast with poached Clifford Farm eggs and Crumb Brothers sourdough bread slathered with Amour Spreads heirloom tomato jam. Holy crap this was good!

Love:

This time of year is usually a little bitter-sweet for me, I’m completely exhausted from all of our summer fun but this is when we have the most abundance of fresh food available. Part of me wants to start easing into the laziness of fall but the beautiful summer produce reminds me to enjoy every last morsel it has to offer. So was the case last weekend, we had just got back from our annual camping trip with our friends and I was feeling under the weather but I had just been gifted a huge box of veggies from my friend Dean’s garden. Instead of spending all day in the kitchen I decided to through this dish together and let the oven do the work for me. Voila, the best of both worlds, a little laziness with a side of summer. The bonus is we got to enjoy this dish for a few other meals which comes in handy when you need a little break. Long live summer. ENJOY!

Easy Pea-sy Farmers Market Salad w/ Basil Miso Dressing and Rhubarb Granita

14 Friday Jun 2013

Posted by cosmohippiechef in dessert, dressing, gluten-free, salad, seasonal, vegan

≈ 1 Comment

Tags

asparagus, beans, cheese, gluten free, local, miso, peas, salad, seasonal, vegan, vegetables

DSCN3036

Food:

Easy Pea-sy Farmers Market Salad w/ Basil Miso Dressing– serves 6

For the salads-

6 c. spinach, 1 c. for each (FM)

1 1/2 avocado’s, 1/4 for each

1 container of Sunbridge pea greens, divided (local, find at Whole Foods or Good Earth)

1 lb. snap peas,  shelled and steamed, 1/4 c. for each (FM)

4 oz. Drake Family Farms goat cheese, divided (FM)

1 1/2 c. crispy garbanzo beans, 1/4 c. for each

1/2 asparagus, trimmed and steamed, divided (FM)

Lemons, salt and pepper

(FM)= Find at Farmers Market

Directions:

1. Divide all the ingredients into 6 glass containers, bowls or Tupperware with lids. (I made these for our lunches this week). Season with a squeeze of lemon and a sprinkle of salt and pepper.

2. Place containers in fridge and they are ready for lunches during the week!

Basil Miso Dressing- enough for 6 salads (2 T. each)

1/4 c. olive oil

1/4 c. apple cider vinegar or Slide Ridge Honey Vinegar (FM)

1/4 c. miso paste (I like chickpea miso)

2 T. water

2 T. Clifford Family Farm honey (FM)

1 T. fresh chives or spring onions,chopped (I used some from my garden)

1/4 c. fresh basil (garden or FM)

Directions:

1. Everything but the onion and the olive oil in the blender or food processor.Blend well, then stream in the olive oil and blend again. Add in onions. Refrigerate, divide into 6 containers to go with the salads. Enjoy!

DSCN3041

Food:

Rhubarb Granita- makes 3 c.

Adapted from Sunset Magazine June 2013

4 c. roughly chopped rhubarb (FM)

1 c. Clifford Family Farm honey

1/2 tsp. Real Salt

DSCN3030

Directions:

1. In a wide pot, cook rhubarb, honey, salt and 2 1/2 c. water over medium heat, stirring often and mashing with a spoon if needed, until rhubarb turns to mush.

2. Pour mixture through a strainer into a bowl and rub with the back of a ladle to push through as mush rhubarb as possible.

DSCN3031DSCN30373. Transfer to a shallow Pyrex dish and freeze until firm, stirring and scraping with a fork every hour if possible, about 4 hours total (stirring the mixture occasionally as it freezes creates large, slow melting ice crystals you want in a granita). Scrape up the granita with fork and spoon into bowls or your favorite vintage glasses. Eat!

Love:

This time of the year I let the Farmers Market dictate the menu at our house. My Easy Pea-sy Farmers Market Salad worked out perfect for our lunches and the Rhubarb Granita was just what the doctor ordered for dessert at the end of these hot days we’ve been having. Every Saturday is an adventure at the market to see what’s new and there is nothing better than having fresh, local seasonal food to play with in the kitchen. Can’t wait to see what will be on the menu next week, until then. Enjoy!

Tamari Glazed Bok Choy

18 Monday Mar 2013

Posted by cosmohippiechef in appetizer, seasonal, Side dish, vegan

≈ Leave a comment

Tags

bok choy, cilantro, garlic, ginger, gluten free, seasonal, vegan, vegetables

DSCN2678

Food:

Tamari Glazed Bok Choy– serves 2

2 large or 4 medium baby bok choy, cut into quarters

2 small garlic cloves, chopped

1 inch ginger, peeled and grated

2 T. mirin

2 T. organic tamari (gluten-free)

1 T. pure maple syrup/ local honey

1 tsp. sesame oil

1 tsp. ume vinegar or rice wine vinegar

1 tsp. cornstarch

1 tsp. coconut oil

Cilantro and scallions- garnish

Directions:

1. Start by heating a heavy bottom pot over medium heat, add the coconut oil and let it melt. While you are waiting for the oil to melt combine the garlic, ginger, mirin, tamari, maple syrup, sesame oil, vinegar and cornstarch in a bowl, mix and set aside.

2. When oil has melted place the bok choy cut side down in the oil and cook for three minutes. Turn and brown on the other cut side for another three minutes. Rotate one more time and cook for another three minutes.

3. At the end of those last three minutes pour the sauce over the bok choy and let the sauce simmer and get thick, just a few minutes. Once the sauce is thick pull of the heat.  Serve immediately!!!

DSCN2666DSCN2668

Love:

I have made this dish more times than I can count. The first time I made this for Billy he thought it was the best thing he had ever eaten! It was a cold snowy day and I needed something warm to hold us over until dinner, I served it over rice and it warmed us from the inside out. Now he request this dish all the time, it surprises me what dishes he’ll like and I was shocked by this one, but happy it was a hit. This is a great dish to try bok choy if you have never tried it before. Serve it with brown rice, quinoa, fish, chicken the possibilities are endless. Also, right now it the perfect time to start seeds for bok choy in the house to transplant into the garden come May! I got seeds for bok choy at the Downtown Pop Up Farmers Market this weekend, I can’t wait to have some growing in my garden this year. ENJOY!

Nutrition:

Bok Choy- Cabbage is a nutrient dense, low-calorie food providing an excellent source of many nutrients especially vitamin C, potassium, folic acid, vitamin B6, biotin, calcium, magnesium and manganese. The cabbage family of vegetables contains more phytochemicals with demonstrable anticancer properties than any other vegetable family. Consistently the higher the intake of cabbage-family vegetables the lower the rates of cancer, particularly colon, prostate, lung and breast cancer.

For another fabulous, nutrient dense, powerhouse of a recipe try my Roasted Brussels Sprout and Romanesco Soup

DSCN2674DSCN2677

Not Your Mama’s Meatballs- For Polly

11 Monday Mar 2013

Posted by cosmohippiechef in DIY, pasta, seasonal

≈ 6 Comments

Tags

bread, cheese, local, pasta, squash, vegetables

DSCN2784Food:

Not Your Mama’s Meatballs- makes 24

1 lb. Grass-fed beef (I use Lau Family Farms, you can find them at Caputo’s or the Farmer’s Market)

1/2 c. bread crumbs (I usually have a bag of bread crumbs from various loafs of bread that didn’t get finished, traditionally these are made with white bread with the crust)

1/2 c. homemade almond milk (traditional these are made with regular milk)

1 1/4 c. Pecorino cheese

salt and pepper

olive oil

Directions:

1. Pre-heat the oven to 375 degrees. Line a baking sheet with parchment paper and place a wire rack over the top.

2. In a small bowl soak the bread crumbs with the milk. In a large mixing bowl place the beef and cheese, season with a few pinches of salt and a few grinds of fresh cracked pepper. Next add the soaked bread crumbs, mix all the ingredients together lightly with your hands.

3. With a small ice cream scoop, scoop out some of the meatball mixture. With your hands roll the mixture between your palms into a round ball and place them on the lined baking sheet. Continue until the bowl is empty.

4. Drizzle with a little olive oil, place the meatballs in the oven for 20-25 minutes or till browned on the edges.

DSCN2764DSCN2768DSCN2777Love:

My amazing grandmother Polly passed away 2 years ago and this last weekend was her birthday. Polly was a tiny BUT mighty little fire-ball of a LADY. She was fiercely independent and loved working so she could take the bus and get ‘out and about’ (she couldn’t sit still to save her life). She was the kind of grandma who made each of us think we were her favorite, I miss her beyond words.

IMG_4222

When I called my mom to ask if it was okay to share this recipe she wanted to make sure that my great-grandma and my grandma Polly got all the credit. All the woman in my family make these Italian meatballs called “Perpets” and I think the only men who have had these meatballs are attached to one of these woman. Growing up these were always an amazing treat and you knew just by the smell of the cheese and oil what was about to happen to your taste buds. The pecorino cheese in these meatballs give them a very distinct flavor. Pecorino cheese is a sheep milk’s cheese and is a little tangier than Parmesan, they make these meatball’s what they are. Perpets are a family tradition, Polly’s mom taught her, Polly taught my mom and my mom taught my sister and me. They are a very special family treat and I am so glad my mom was okay with me sharing the recipe with all of you.

These Perpets are traditionally made with white bread and milk and fried in olive oil, this is probably why I don’t make them that often. So I decided to use my multri-grain bread crumbs and homemade almond milk, I also thought I would bake them instead of frying them. They turned out great! I served them over spaghetti squash with Pasta all Vodka sauce (minus the bacon) and garnished the dish with fresh parsley, pecorino cheese and a drizzle of olive oil. Feel free to use them anyway way you want.

Nutrition:

*All I can say on this recipe is the beef is local and grass-fed.

*I am happy that I was able to stay true to the roots of this recipe, but use healthier ingredients and a healthier method of cooking and get the same great flavor I’ll know forever.

*The only man I have made these for is my sweetie, make them for your sweetie and see what happens.

DSCN2785

Stuffed Acorn Squash

27 Sunday Jan 2013

Posted by cosmohippiechef in Events, seasonal, Side dish

≈ 2 Comments

Tags

brown rice, cheese, garlic, gluten free, kale, local, seasonal, squash, vegetables

DSCN2573

Food:

Stuffed Acorn Squash serves 5-10

5 acorn squash, cut in half seeds removed

1 lb. local grass-fed beef (I buy Lau Family Farms)

1/2- 3/4 lb mushrooms of choice, chopped (I used shiitake)

1 large onion, chopped

1 c. celery, chopped

4 garlic cloves, chopped

1 bunch of kale or swiss chard, stems removed and leaves chopped

1 T. each rosemary, thyme and sage, chopped

1 c. cooked brown rice, millet, wild rice or non-glutinous grain of choice

3/4 c. parsley, chopped and divided

1/2 c. pecorino or parmesan cheese, grated

2 T. ghee

salt and pepper

Directions:

1. Start by preheating the oven to 375 degrees. Place the prepared acorn squash cut side down on a parchment lined baking sheet. Place the squash in the oven and bake for 30 min. Take baked squash out of the oven and set aside. Turn the oven down to 350 degrees.

2. Place a large saute pan on the stove top over medium heat , add the ghee and when melted add the mushrooms and begin to saute. Don’t touch the mushrooms for a minute or so to give them time to brown. Next add the onions, celery and garlic and begin to saute with the mushrooms, salt and pepper the veggies just a bit. Saute for 5-7 minutes.

3. Next add the beef, use a potato masher to incorporate the meat into the veggies, season with a little more salt and pepper. When the beef is just about cooked, another 5-10 minutes add the rosemary, sage and thyme. Stir to combine.

4. Pull the beef and veggie mixture off the heat and add 1/2 c. chopped parsley, cooked brown rice and chopped kale, stir well to combine all the ingredients.

5. Scoop the mixture into the acorn halves, in a separate bowl combine 1/4 c. remaining parsley and cheese, season lightly. Spoon this mixture over the stuffed acorn squash (there will most likely be extra filling, save for a snack). Bake in the oven for 20 minutes or until the cheese has melted and began to brown and the mixture is warmed through. Serve hot with a drizzle of good quality olive oil. ENJOY!

Nutrition:

Grass-fed beef: http://www.laufamilyfarm.com/why-grass-fed/

Shiitake Mushrooms: These meaty flavorful mushrooms contain a substance called eritadenine, which encourages body tissues to utilize cholesterol and lower the amount circulating in the blood. Shiitake also have antiviral and anti-cancer effects.

Acorn Squash: Acorn squash is an excellent source of vitamin A, vitamin C and beta-carotene. It is also a very good source of thiamin, vitamin B6, potassium, magnesium,and manganese, and a good source of iron. It is a great seasonal choice in place of traditional bell peppers which are a late summer crop.

Love:

I made these bad boys for my Holistic Nutrition class last weekend. I wanted to show my students what eating a more plant-based Holistic diet looked like. We started with Raw Oatmeal made with Homemade Almond Milk and served it with local Drake Family Farm Goat Yogurt, our lunch item was Lentil Stew w/Kabocha squash and for dinner we had these Stuffed Acorn Squash. When people hear the word plant-based they think vegan or vegetarian, but to me it means whole foods in the natural state that are local and seasonal, not processed packaged foods. I live by a 90-10 rule, 90% of my diet consist of plant foods, this includes beans, legumes, grains, rice, nuts and seeds, and lots of fresh fruits and veggies, the other 10% leaves room for local, sustainable QUALITY animal foods, this includes local beef and chicken on occasion, wild fish, yogurt and cheese. It’s not the quantity but the quality of the choices we make, this is what Holistic Nutrition is all about. I hope you enjoy this recipe, my students sure did!

Roasted Brussels Sprout and Romanesco Soup w/ Leeks

06 Sunday Jan 2013

Posted by cosmohippiechef in seasonal, soup, vegan

≈ 6 Comments

Tags

brussels sprouts, garlic, gluten free, lemon, romanesco broccoli, seasonal, soup, vegan, vegetables

DSCN2566

Love:

I lovingly refer to this soup as “Lean Mean Green Soup.” Why you ask? The holidays are over which means most of us are trying to push the restart button on our diets, our loved ones have gone home and here in Salt Lake the inversion has set in and we are all getting sick. In an effort to ward off the dreaded cold/flu and the seasonal depression that comes out of no where in January, I whipped up this soup which is loaded with vitamins and minerals and is vegan and gluten-free. Most of the time we eat for pleasure sometimes we need to eat for our heath, lucky for all of us this Roasted Brussels Sprout and Romanesco Soup w/ Leeks supports both. Here’s to a happy healthy 2013, ENJOY!

*This soup is perfect if you are on a New Years cleanse or eating clean, if not add your favorite local cheese and you’ll have yourself a ‘broccoli cheese’ soup!

Food:

Roasted Brussels Sprout and Romanesco Soup w/ Leeks- makes a big ‘ol pot

2 leeks, cleaned and chopped (don’t use the fibrous ends)

2 c. celery chopped

2 lbs. brussels sprouts, ends trimmed and cut in half

2 lbs. romanesco, cleaned, stalk and leaves removed and cut into chunks

10 small garlic cloves, pulled away from the bulb but left in skins

2 T. olive oil (I used ghee)

4 c. organic low sodium veggie broth (homemade is best)

2. water

1 bay leaf

salt and pepper (I used pink pepper)

To finish/garnish-

Lemon olive oil (if you don’t have use regular olive oil and a squeeze of fresh lemon)

Fresh chopped parsley and cilantro

a sprinkle of real salt or celtic salt and pink pepper (you can use regular pepper)

DSCN2565

1. Pre-heat oven to 375 degrees. Line two baking sheets with parchment paper. On one baking sheet place the prepared brussels sprouts, on the other place the chopped romanesco. Drizzle both with just a bit of olive oil and sprinkle w/salt and pepper.

2. Prepare the garlic, place the 10 small cloves still in their skins but pulled away from their bulb in a piece of tin foil big enough to wrap up. Place this foil packet on one of the baking sheets. Place the brussels sprouts, romanesco and garlic foil packet in the oven and roast for 25 minutes.

3. After that 25 minutes remove the brussels sprouts and romanesco from the oven, turn off heat and leave the garlic packet in the oven for another 15 minutes. Remove and set aside until cool enough to handle, then remove the roasted garlic from their skins, discard the skins and reserve the garlic to be used in the soup.

4. Heat your favorite soup pot over medium heat. Add 2 T. olive oil and the leeks, stir and season with salt and pepper. When the leeks begin to soften and get fragrant add the celery, stir to combine and season with a bit more salt and paper. After 5-7 minutes add the roasted brussels sprouts, romanesco and garlic. Stir to combine. Add the veggie broth, water and bay leaf. Bring mixture to a boil, turn heat down to low, place the lid on the pot and simmer for 20 minutes.

5. When the soup has simmered for 20 minutes pull pot off the heat. Let cool just a bit. Working in batches puree the soup and return it to the soup pot. Keep warm or eat immediately. Check for seasoning, garnish and EAT!

DSCN2556

Nutrition:

Brussels Sprouts: Brussels sprouts are loaded with vitamin K which promotes healthy bones, prevents calcification of the body’s tissues and serves as an antioxidant and anti-inflammatory agent, essential for proper brain and tissue function. One cup of brussels sprouts contain 161% of our daily dose RDA of vitamin C which ensures a healthy immune system. They also contain over 20% of our RDA for vitamin A which also helps boost our immune systems. One cup of brussels sprouts contains almost 25% of our RDA for folate. A biochemical event called methylation cycle relies folate to properly transcribe DNA, transform norepinephrine into adrenalin as well as transform serotonin to melatonin. (Translation- keeps us feeling happy!)

Romanesco: Helps fight viral infections, protects from free radicals, improves healing, HELPS PROTECT FROM COLDS AND FLU, reduces depression.

*My other favorite go to immune boosting soup is my Homemade Chicken Soup

Homemade Sweet Potato Falafel and Homemade Naan

16 Sunday Dec 2012

Posted by cosmohippiechef in beans, DIY, seasonal, vegan

≈ 4 Comments

Tags

beans, garlic, gluten free, lemon, parsley, seasonal, squash, vegetables

DSCN2529

Food:

Sweet Potato Falafel makes about 18 (Adapted from My New Roots)

2 medium sweet potatoes (orange inside), roast on a baking sheet lined with parchment @375 for about 1 hour or tender inside

1 1/2 teaspoons ground cumin

2 small cloves of garlic, chopped, plus 2 t. Laziz Toum (garlic condiment)

1/2 teaspoons ground coriander

2 big handfuls of fresh cilantro/coriander, chopped

Juice of half a lemon

a scant cup chickpea flour, (you can buy or make your own by placing 1 1/2c. chickpeas in blender and grind yourself. Be sure to sift before using)

salt and pepper

Pinch of cinnamon and nutmeg (about 1/2 t. each

Gomashio for topping

Directions:

1. After you have roasted your sweet potatoes and they are cool enough to handle, peel and place in a bowl. Smash with the back of a fork, next add all the rest of the ingredients EXCEPT the gomashio. Stir to combine. Taste for salt and pepper and add more if needed. Place in the fridge for at least 30 minutes for the mixture to firm up.

2. Take the sweet potato mixture out of the fridge, using a medium size cookie scoop, scoop the sweet potato mixture out a scoop at a time. I like to flatten mine into an oval shape. Place on a baking sheet lined with parchment. Sprinkle with gomashio (if you don’t have gomashio roll the falafel in sesame seeds). Bake in the oven @400 degrees for 20-25 minutes or until golden and slightly crispy. Take out and let cool just a bit.

DSCN2515

DSCN2517

Homemade Naan makes 8 (recipe from the magazine Homemade Bread)

2 tsp. sugar (I like sucant)

1 c. warm water (105-115 degrees F)

1 1/2 tsp. active-dry yeast

3 c. all-purpose flour (I used organic whole wheat flour)

1 tsp. salt

3 T. yogurt (I used buttermilk it’s what I had on hand)

6 T. ghee (clarified butter-love!)

Directions:

1. Dissolve the sugar in warm water, add yeast. Set aside until foamy about 10 minutes.

2. Mix the flour and salt in a large bowl. Add the yeast mixture and yogurt. Using your fingertips, mix with the dry ingredients until a soft dough forms.

3. Turn dough out onto a floured surface, knead it until it is smooth and elastic. Form dough into a ball.

4. Oil a large mixing bowl, roll the ball of dough in it until the surface of the dough is oiled. Cover with plastic wrap and let dough rest in the bowl until it has doubled-about an hour.

5. Place a cast iron griddle or skillet in the oven and preheat to 400 degrees (I used a pizza stone).

6. Turn the risen dough onto a floured surface, and knead for 10 minutes (I know a long time but it’s totally worth it!). Divide the dough into eight equal sized round balls. Pat each ball between your palms or an on a lightly floured surface until you have an oval about 5×7 inches in size. Apply ghee to each oval with your fingers or a pastry brush, sprinkle with salt.

7. Place naan on the hot cast iron griddle (I used a pizza stone, and I cooked 2 naan at a time) oe skillet until they puff and brown lightly- about 5 minutes. Flip each naan, apply a bit more ghee and bake about 2 more minutes.

8. Remove from the oven and serve hot!

DSCN2520

DSCN2521

Putting them together:

1. Homemade falafel

2. Homemade naan

3. Parsley and cilantro leaves

4. Sunbridge sunflower sprouts

5. Laziz Hummus and Muhamara

DSCN2523

DSCN2526

I cut 1 naan in half, slather hummus on one side and muhamara on the other. Sprinkle parsley and cilantro on one side and sunflower sprouts on the other. I cut the falafel in half and lay them on one side, top with the other side. EAT!

Nutrition:

Sweet Potato: Sweet potatoes contain unique root storage proteins, which have been shown to exert  significant antioxidant effects. The presence of these proteins, along with the high content od carotenes and vitamin C, makes sweet potatoes a valuable food for boosting antioxidants in your body. Sweet potatoes have been shown to help stabilize blood sugar levels and improve the response to hormone insulin.

Chickpeas: Garbanzo beans are a good source of fiber, folic acid and manganese. They are also a good form of protein as well as minerals such as iron, magnesium, copper and zinc. Garbanzo beans can help lower cholesterol and improve blood sugar levels making them a great food for diabetics and insulin-resistant individuals. If served with high quality grains, garbanzo beans are an extremely low-fat complete protein.

Love:

This blog post is LOADED! It is very involved but the work is worth the end result. There is a number of reasons I wanted to get this post on the blog.

1. I have made these falafel a number of times last fall and fell in love with how simple they are. You can make a sandwich with them or a salad. Quick, easy and great to have on hand. They are from one of my favorite blogs, My New Roots.

2. If you haven’t met Moudi and Derick the (cute) men behind Laziz you’ve been under a rock. They are all over the place right now showcasing their wonderful products. You can find them at a number of Farmers Markets as well as some of our great local retailers from Harmon’s to Liberty Heights Fresh. Their hummus is creamy, their muhamara is just the right amount of sweet and spice and their Toum (garlic condiment) is like nothing you’ve ever had- think straight garlic mashed with olive oil and lemon. Translation- YUM!

3. I was totally inspired my one of my local fellow bloggers Becky over at Vintage Mixer. I told her we must have been on the same wave length with our cooking, she made lamb falafel and homemade pita bread. She also highlighted Laziz.

4. I have been on a kick of making my own bread. Every year I try to learn a new skill from roasting my own chicken, making my own almond milk or learning to make beans from scratch. Bread is my project this winter and getting to make homemade naan for these falafel was so gratifying.

Whole foods are always best, yes it takes more time to make things from scratch BUT the quality, flavor and nutritional value are far greater than anything you can buy. For me there is no greater joy than tackling a great new recipe and there is also no greater joy than being inspired by the wonderful people around me.  ENJOY!

← Older posts

Like me on Facebook

Like me on Facebook
Follow Me on Pinterest

Recent Posts

  • Leftover Local Turkey, Apple, Potato and Smoked Gouda Salad w/Cranberry Mustard Vinaigrette
  • Spiced Apple Zucchini Muffins (Cupcakes) w/Chai Buttercream Frosting
  • Oat Free Granola- Seasonal Fruit and Local Goat Yogurt Breakfast Parfaits
  • Cherry, Quinoa, Goat Cheese Salad w/Honey Wine Shallot Mustard Vinaigrette
  • Rhubarb Ginger- Mint Lime Shrub

Archives

Categories

Tags

almond meal apples arugula asparagus bananas beans beets bok choy bread broccoli brown rice brussels sprouts cauliflower cheese chicken chilies chocolate cilantro coconut coconut milk corn dates eggs Farro fish fruit garlic ginger gluten free goat cheese goat yogurt green onions greens herbal honey hummus juicing kale lemon lentils liquor local mexican mint miso nuts oats onions parsley pasta peaches peanut butter peas potatoes pumpkin quinoa radishes raw rhubarb salad seasonal seeds soup spinach squash strawberries tart dried cherries tofu tomatoes turmeric vanilla vegan vegetables walnuts zucchini

Enter your email address to follow this blog and receive notifications of new posts by email.

Join 127 other subscribers

RSS Cosmo Hippie Chef

  • Leftover Local Turkey, Apple, Potato and Smoked Gouda Salad w/Cranberry Mustard Vinaigrette

Spring SuperFoods

Spring Comfort

Spring Green

Spring Fresh

Spring Raw

Spring Love

Spring Clean

Anytime Classic

Anytime Comfort

Anytime Classic

Anytime Comfort

Classic

Classic

Classic

Classic

Classic

Classic

Foodies Search Here:

Like me on Facebook

Like me on Facebook

Recent Posts:

  • Leftover Local Turkey, Apple, Potato and Smoked Gouda Salad w/Cranberry Mustard Vinaigrette
  • Spiced Apple Zucchini Muffins (Cupcakes) w/Chai Buttercream Frosting
  • Oat Free Granola- Seasonal Fruit and Local Goat Yogurt Breakfast Parfaits
  • Cherry, Quinoa, Goat Cheese Salad w/Honey Wine Shallot Mustard Vinaigrette
  • Rhubarb Ginger- Mint Lime Shrub

Categories

Archives

  • December 2014 (1)
  • November 2014 (1)
  • October 2014 (1)
  • June 2014 (3)
  • May 2014 (1)
  • April 2014 (2)
  • March 2014 (2)
  • February 2014 (1)
  • January 2014 (3)
  • December 2013 (2)
  • November 2013 (3)
  • October 2013 (7)
  • September 2013 (4)
  • August 2013 (3)
  • July 2013 (3)
  • June 2013 (4)
  • May 2013 (1)
  • April 2013 (4)
  • March 2013 (5)
  • February 2013 (4)
  • January 2013 (4)
  • December 2012 (3)
  • October 2012 (1)
  • September 2012 (3)
  • August 2012 (3)
  • July 2012 (5)
  • June 2012 (2)
  • May 2012 (2)
  • April 2012 (4)
  • March 2012 (7)
  • February 2012 (13)
  • January 2012 (9)
  • December 2011 (2)
  • November 2011 (3)
  • October 2011 (8)
  • September 2011 (1)
  • August 2011 (5)
  • July 2011 (9)
  • June 2011 (13)
  • May 2011 (8)
  • April 2011 (14)
  • March 2011 (8)
  • February 2011 (4)
  • January 2011 (5)
  • November 2010 (7)
  • October 2010 (2)
  • August 2010 (4)
  • June 2010 (8)
  • May 2010 (3)
  • April 2010 (10)
  • March 2010 (4)
  • February 2010 (1)
  • January 2010 (4)
  • November 2009 (3)
  • October 2009 (3)
  • September 2009 (9)
  • August 2009 (1)
  • July 2009 (4)
  • June 2009 (8)

Create a free website or blog at WordPress.com.

Privacy & Cookies: This site uses cookies. By continuing to use this website, you agree to their use.
To find out more, including how to control cookies, see here: Cookie Policy
  • Follow Following
    • Cosmo Hippie Chef
    • Join 127 other followers
    • Already have a WordPress.com account? Log in now.
    • Cosmo Hippie Chef
    • Customize
    • Follow Following
    • Sign up
    • Log in
    • Report this content
    • View site in Reader
    • Manage subscriptions
    • Collapse this bar
 

Loading Comments...